Showing posts with label Regency. Show all posts

Saturday, 30 August 2025

HSM '23, Ch. 12 - Paired to Perfection: A pair of mustard-yellow fingerless mitts


I wanted to have these finished during my summer vacation of 2023 - when Leimomi came visiting and we took photos in historical clothes in historical backdrops... and then the mitts took longer to make than I had hoped, and I lost yarn chicken with the ball of yarn I had with me on our travels. So they only got definitively finished in January of 2024. (It's always the weaving in of ends that takes forever because procrastination.) Aaaand I'm only posting them here now. I have quite a lot of blogging to catch up on.

The yarn I used comes from the same deadstock haul the yarn in the baby blanket I made last year came from. This one is a 28/2 merino; preeeetty fine (I have a couple in 30/2, too; even finer). I doubled the yarn because undoubled it would be a recipe for madness, and also because the few fine wool items from the period of around 1800 I did find (most of them in the V&A) suggested to me a gauge closer to that. Here it's about 10 stitches and 16 rows per inch - I'm always proportionally higher on the row count than the usual 3:4 ratio.

I knitted the mitts according to info I found online in lots of places - both people's descriptions and pictures I peered at. I'm not certain I got it right, but at least I made a good stab at it. My favourite thing about this historical mitt construction as I've inferred it is the way the long body of the mitt is shaped - much like with historical stockings, you do the shaping along one line down the garment, on both sides of the "seam"; in this case, the "seam" is on the outside of the arm, opposite the thumb. It's easier to do than trying to distribute it evenly all around, and actually looks quite good.

Like so:


In this lightweight yarn, the whole pair used up only 44 g of it. Which makes it rather funny that I lost yarn chicken with it anyway. It goes to show that these were truly made from remnants :D - my ball was pretty small. 

* * *

I have quite a lot of this mustard yellow, actually. It's a colour I'm not sure would look good on me as a main garment close to my face, but for historical accessories, it somehow seems close to perfect for me. And yellow is such a cheerful colour.

I reeeeally want to make yellow stockings now. Do I have any use for Renaissance stockings? Nope. But I want to do it For Reasons. Also, I do have Knitting with the Modern Maker, I do want to make more than just socks out of it. (Given my short thick-ish legs, I was thinking I might have to adjust the pattern, whichever pattern I end up using; and then I remembered my row ratio and thought, maybe that would actually end up perfect.)

If I feel particularly crazy, I could turn this yarn into a sweater, and dye it into a more suitable colour... probably not. I also have this yarn in other colours, though. One is a perfect match for a beloved thrifted turquoise-ish turtleneck sweater that, alas, got shrunk in the wash years ago (I had carefully put it in the laundry storage area separately, someone grabbed it with the regular stuff anyway). I am about 99% certain that sweater must have been made from the exact same yarn, considering the yarn's industrial production origins. So there is one definitely madness inducing knitting project in my future. I think the original was indeed made from a single yarn; I'm not doing that, but a sweater on 2 mm needles will be bad enough.

For now, I started with modern socks, just to see how this yarn wears in something less madness-inducing - and to see how I feel in wool socks with zero polyamide in them. :-) There was recently a very funny situation when my mother and me met up for a brief spot of knitting in the park, we pulled out our projects... and they were both mustard yellow. :D With the difference that mine was a sock in this yarn, and hers was a not-sock in a regular modern sock yarn. :D

* * * 

I'm honestly not entirely sure how I made the thumb gusset anymore...


I might write up something about making fingerless mitts like this once I am more certain I know what I'm doing. I did write it up, but currently it's just notes for me to remember what I did - it needs a more substantial treatment for something presentable to the public. I do have a lot of yarn to use up, so I do intend to make more - also to go well with different outfits. (I have a lot of fabric to use up, too...)

Just the facts, ma'am:

What the item is: Fingerless mitts
How it fits the challenge: It's a pair. Strictly speaking, they're not paired to perfection, there are imperfections between them... but they're minor. :D
Material: Thin merino cone yarn, doubled (Filati Biagioli Modesto Lambswool extrafine 28/2)
Pattern: My own
Year: c. late 18th-early 19th century
Notions: 2 mm double pointed needles (in reality they're more something like 1,85 mm)
How historically accurate is it? I'm not sure; it's as good as I could figure out, but it's not perfect. I'm not sure if my thumb construction is correct (or more precisely, I'm pretty sure it could be done better). And I'm not sure how accurate the yarn is for my timeframe. (Merino definitely already was around, but I have no idea if they would have made yarn exactly like this out of it, or if they would have used it exactly like this exactly for mitts. Very fine wool yarn did exist, but I'm not sure exactly how fine we're talking.)
Hours to complete: No idea :O
First worn: In January 2024, as they were finished, just because. :D I got quite a lot of wear out of them in Autumn of that year with modern clothes - they do make a great addition to your wardrobe in changeable weather or cold rooms, and having the fingers free while staying more toasty is indeed great.
Total cost: I got the yarn for free! It's old unused stock remnants from work that was sitting in storage and being a moth hazard.


Further knitting facts:

Yarn weight: Lace - as mentioned above, Nm 28/2, i.e. 1400 m / 100 g; doubled. So gauge equivalent would be something in about 700 m / 100 g.

Gauge: c. 10 stitches and 16 rows / in

Amount used: 44 g


Wednesday, 18 October 2023

Why I have not made the Bernhardt stays (yet). Also, J.S. Bernhardt is awesome and it is not stressed enough.

It's not for lack of trying. (Well, to a degree it is, but that has more to do with the past three years plus having been... A Thing.)

I wanted to make a variation on Fig. F - I did mention that some time ago.


But I just couldn't make the scaled pattern work for me. The operative words being "for me". They're great designs that clearly do the job and they explained a whole load of things to me - J.S. Bernhardt left an amazing legacy for people interested in Regency costuming (here's the original scan). But his gridded scaling method leaves a few things to be desired.

Funnily enough, the answer as to why does, I think, lay directly in Bernhardt's text.

"Such a body (i.e. "well-grown") has to have... the thickness and length proportional." (p. 43; 47 in the scan)

That, dear readers, is where it falls apart for me.

Not only is my torso proportionally longer, it turns out my back is probably comparatively narrower than my front. With Bernhardt's "measure the back and derive a square grid from it" scaling method, I ended up with a pattern that was a whopping 8 cm too short for me.

Trying to alter an essentially conical-shaped pattern by that amount of length is... frustrating.


I had to figure out where to do it, first. And I realised it needed to be done at both bust and above-waist level.

I might have been able to make it work, don't get me wrong. I got started. I just have too many other things to do, so it never got finished. At one point I managed to align my cutting lines wrong on my additional strip of paper, and there were too many curves to be trued over a pretty large distance and, well, there is such a thing as "more trouble than it's worth".

The good news?

Bernhardt may have provided us with a neat gridded sizing method, but it isn't the only thing he provided us with. He also shows how you can take a basic conical block and turn it into his stays designs.

So what I'm actually going to do is make a basic conical block for myself, and turn it into his stays design.

It turns out that drafting a basic block and messing about on paper is actually a perfectly historically accurate way to design Regency women's clothes.

Oh, by the way?

The book doesn't just feature stays patterns. J.S. Bernhardt is AWESOME.

(I've already cleared this image up because LOOK AT THAT MOTHERLOAD OF REGENCY AWESOMENESS.)


SLEEEEVES


ANOTHER SLEEVE! SKIRTS!

(Oh, and there's Part 2. With adjustments for posture, men's blocks, and stockings.)

I still need to properly read his text and see if he left any other pointers. Reading German in fraktur isn't the easiest thing for me to do; I can figure it out (with the help of online dictionaries), but it's slow going that tires me out quickly. So far I've learnt that I should start at centre front and draw the curves as they are on the body, according to sight, which... isn't particularly helpful.

(I mean, I do understand to a degree. I have successfully drafted a basic block for my grandma, long distance, applying the time-honoured method of eyeballing to some of the curves. The problem is that it's much easier to do that with the curve of a rounded back, which you can see clearly in a side view of the person, than it is to do it with the curve of a pattern piece wrapping around the body horizontally.)

No matter:

There's the arc method described in Patterns of Fashion 5, which right away takes into account torso length and different measurements for front and back. Which, phew.

There's Mariah Pattie's method.

I tried combining the two in 1:5 scale, and it seems theory does translate into practice thus far. I used two different radiuses for front and back. (Ignore the messy lines and unclear style, this is just doodling to see if theory translates into practice, and the 1:5 scale kind of messed with my numbers here and there.)

And then there's the... phenomenon... I came across when drafting my sister's folk costume bodice using a variation on Bilikis' (Nigerian) bodice drafting method.


I suspect my final method will be some sort of amalgam. I have an idea how I could combine the arc method and the... phenomenon... for an easy creation of curves.

Bilikis' method of aplying various lines for various vertical points on the body and differentiating underarm and full bust/chest definitely was another of the missing links that made me go "oh, of course!" I think basically the winning combination is doing that but on a curve.

(Mariah Pattie's method looks great and simple, but I have my suspicions regarding possibly too unrealistically large radiuses for some people. Generally, it doesn't look particularly friendly to small sewing spaces; until recently, I didn't have a good large drafting / cutting table myself. Also, in her basic method she has the same curve for front and back, and that's not what I'm seeing in Bernhardt's draft. But if it works for you, more power to you!)

It's funny, because this burst of Regency inspiration actually came about from my pondering of 1780s stays and possible local folk costume variations thereof. It turns out the local harvest festival in September (more or less a harvest festival) references the elevation of my current hometown to town status in 1788. Which gives me the perfect excuse to finally make the jacket-and-petticoat ensemble I've been dreaming of since 2015 (although it won't be happening in such fancy fabrics). No promises as to when - I have bad track record in that regard - but it's definitely going to happen. I have a printed cotton with personal significance that is waiting to become some variation on the Amalia jacket. I hope I can get a collar out of it, too.

Saturday, 15 May 2021

HSM '17 #2: The c. 1800 sleeveless spencer / bodice

No, that's not a mistake: it really is a make from 2017 (in its final finished state). There's really a lot I've never gotten around to blogging about...


Once upon a time, I fell in love with the 1802 portrait of Heinrike Dannecker by Gottlieb Schick, and decided I wanted to make an outfit inspired by it - really possibly my favourite portrait from the era, fashions-wise, as I've already mentioned.

Then later I came across two other portraits involving sleeveless bodices that I took inspiration from: this ca. 1795 miniature by Augustin Dubourg and the 1800 portrait of the Comtesse de Bonneval by Anne-Louis Girodet de Roussy-Trioson which was good for figuring out how the front would sit at a slightly later date than 1795. :-) (Links to Pinterest because the original links are broken.) - Yes, they're both blue worn over white dresses. My colour bias is showing.

I had some fabulously shiny cotton satin upholstery fabric that I had snatched up from a remnant bin and that seemed to want to become this sleeveless bodice. Red! Shiny for evening wear! So wonderful.

I played with the pattern for my transitional "bra" to turn it into a front-lacing bodice, and as I placed it on the fabric, I thought "maybe I could squeeze two things out of this fabric" and pieced the front to accommodate a more tetris-style pattern placement.

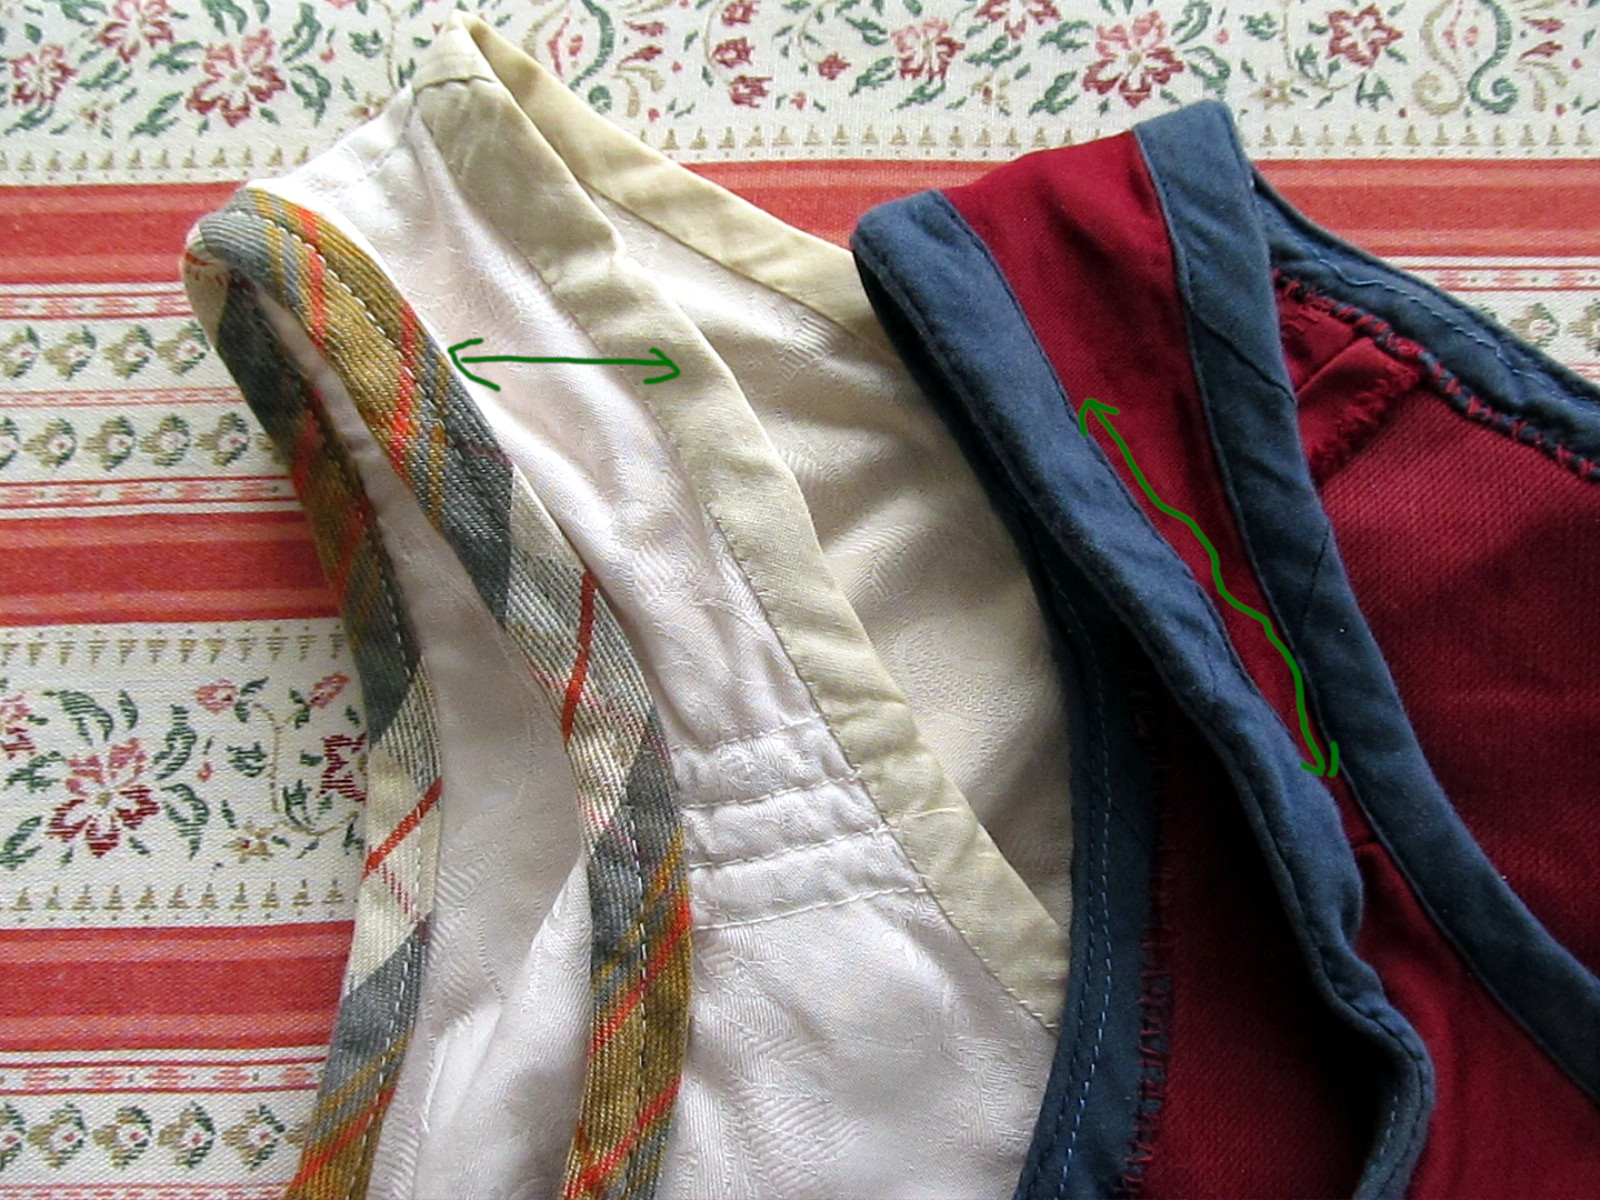
I ended up shifting the grainlines in the three front-and-shoulder pattern pieces in comparison to the "bra". Since it was my own experimental pattern it wasn't exactly set in stone anyway but:


I find that shifting grainlines when altering and piecing historical patterns is actually mostly OK - as long as you keep your grainlines mostly the same / symmetrical on both sides of the body, don't remove bias from where it serves a purpose, or don't put bias somewhere you really don't want to stretch out! (Which was actually why I shifted it on the shoulder strap pattern piece: I wanted it lying nicely along the grain. That oddly shaped front bit got its grainlines shifted just for the sake of placement on fabric, though.) When loking at the patterns in the priceless German disertation on the Kostümsammlung Hübsch by Johannes Pietsch, I realised this was done historically, too, with pieced garments. So in that context, you can totally shift grainlines away to your heart's content!

I sewed the bulk of the seams by machine because I was excited and wanted to finish this bodice faster than my previous historical makes (four years is a rather excessive precedent and is stretching one's patience, once the undergarments are already done). Then I got the bright idea to fell stitch / whipstitch (?) the seam allowances down, which turned out to be not very brilliant actually because it resulted in ridges on the outside (thick upholstery fabric). But I kept it that way while I was ahead...

The lacing eyelets were rather a pain. The thick upholstery fabric was so hard to make proper awl holes in! And deciding to use buttonhole silk twist didn't help - it's bulkier. Though also neater, even if mine turned out to be lighter in colour than the fabric.


Thankfully, I decided to lace it with a cord I knitted myself out of cotton crochet yarn, with two stitches only (just like lucet, without a lucet), which is thin enough to pass through the resulting tiny eyelets (a large blunt needle in place of a bodkin helps, though, although it also passes through with more difficulty).


I spaced the eyelets as suitable for spiral lacing - although looking at Comtesse de Bonneval, I clearly could have gone with a regular criss-cross placement; I somehow forgot that part. (I need to work on keeping my inspiration images and sources before me throughout the process of working on things because that sort of thing happens to me far too often.)

I made a thread bar on the inside at the top edge, also from my buttonhole silk, to tie one end of the lace to. The bottom end of the lace I originally usually led back up underneath and tied to the thread bar again as well. When I had a not-lacing-tight kind of day (like when I wore this over a modern bra to church...), I just tied that end off at the bottom. Then that became the norm because my bust had grown about 6 cm since I first made the bodice... and now I've lost some cms there again, though not the full 6. But that's the flexibility of lacing for you! :-)
 
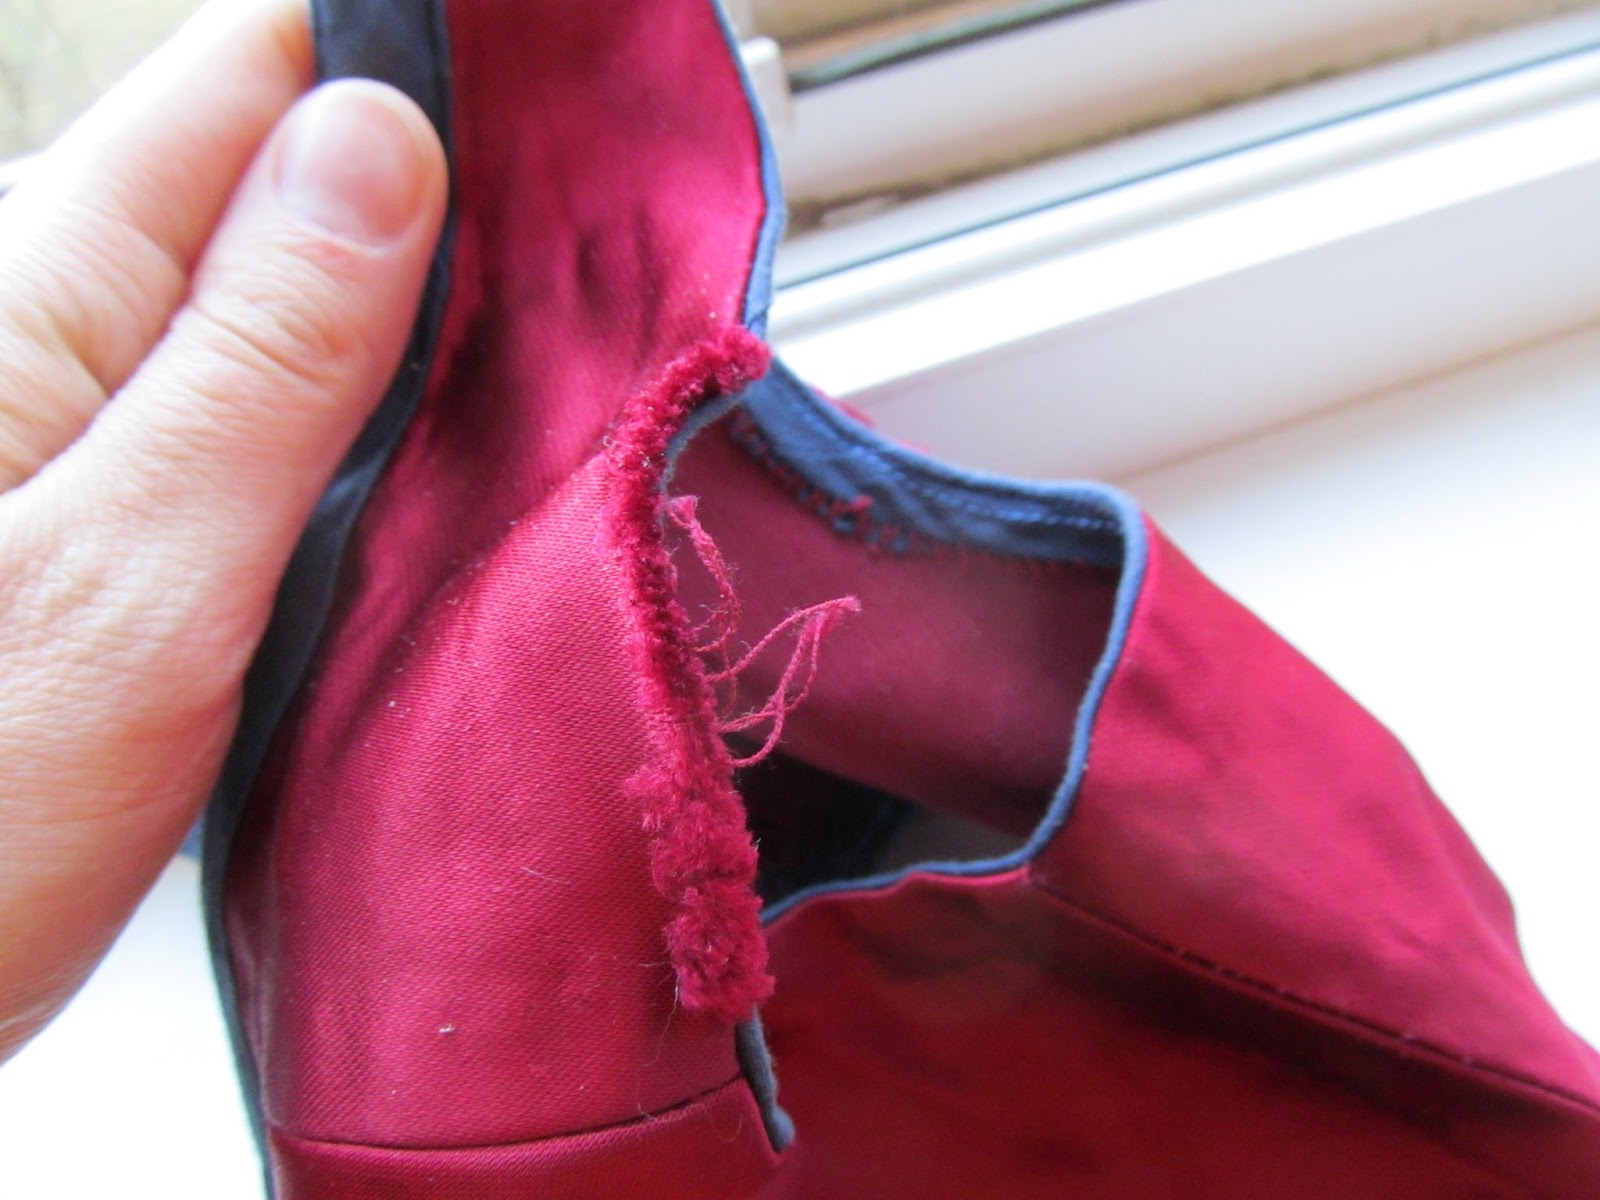
Originally, I only finished all the edges with piping. I don't even think it’s historically correct for the period anymore (maybe it's only an 1810s-onward thing?); and in either case, the folly of using an ahistorical thick upholstery fabric this way became apparent
soon: the fabric ripped / unravelled in several places at the edges in the first wash, before I even had pictures taken. (All the photos in this post were taken during the restorative process or afterwards, I have zero pictures of it in the only-piping state...)

ETA: The problem is that, in order to turn the seam allowances around the curves, I had to cut them quite narrow and - well, the thick fabric is simply not suited to that sort of treatment, together with the thick turn of cloth it puts too much strain on it, and the fact it's a satin (= a somewhat looser weave) did not help...

 
I was grumpy about it for a bit, because it ruined the clean look I was going for, but then I caved in and added more trim to save it / cover it up: bias strips whip-stitched (fell-stitched?) to the piping & stitched down with backstitch on the other side, and bias binding at the lacing holes in the front.

So that's the whole of the lesson of not using historically accurate fabric and historically accurate techniques. :P

(More historically accurate fabrics would also likely result in the historically accurate wrinkles one can see in the portraits...) 

ETA: Notice that the bottom edge, which isn't so curvy, survived my piping treatment unscathed, presumably because I did not cut the seam allowance as closely as I did around the curves and the lacing holes at the front openening.


Anyway. Despite the problems, I'm happy with it. I'm particularly happy with the basic shape of the pattern, because that looks exactly the way I wanted it to look. It looks so good I could not believe it when I first saw myself in the mirror and later photos... It sits just like the bodices from the portraits. It's a very satisfying experience to get that result without the jumping board of a pattern taken from an extant garment, with something you just kind of eyeballed.

This is a photo by Páv Lučištník, so far the only good one I have of myself in full Regency getup... my tendency to forget to put on jewellery strikes often! :D So does my "RBF"; for some reason the photos of myself from the events that I know of always make me look bored even when I know I was anything but! Here I was looking at the people dancing and apparently previously tried to take some photos of my own. It's back from the bodice's first outing in its altered state in February 2017. I think I need to revive that headdress style...

So I'm totally going to one day make another one in similarly rather inaccurate cotton velvet, with hopefully more accurate construction techniques. I was originally thinking of a blue velvet remnant, but now there's the Purple HSM challenge and I thought back to the purple velvet... and there's Vanessa's oh-so-pretty printed cotton one... aaand I have some thrifted silk garments intended for repurposing as accessories... so, considering how easy it is to make this garment out of remnants, I suspect I'll eventually end up with a wide choice of sleeveless spencers to spice up my Regency ensembles. :D

I also want to eventually share the pattern (because it turned out so well!), but this post has been in limbo long enough and I don't want to keep waiting till I finish digitising the pattern... especially because it occurred to me that with how simple it is, it may be a good training ground for improving my grading skills...


Just the facts, ma'am:

What the item is: “Regency” bodice / sleeveless spencer
The Challenge, and how this item fulfils it: HSM '17 #2: Re-Make, Re-Use, Re-Fashion. I used trim to save / cover up fabric damage.
Fabric/Materials: Marked down remnant of red cotton upholstery-weight satin (NOT recommended, with emphasis!); navy blue lightweight cotton sateen for trim (pretty great!)
Pattern: My own, an evolution of my wrap stays / brassiere.

Year: c. 1800
Notions: red thread (polyester, I believe), dark blue cotton thread; red buttonhole twist for the lacing eyelets & a thread bar on the inside which I tie the lacing to; dark blue cotton crochet yarn knitted into a lacing cord; thin linen cord for the piping.
How historically accurate is it? Meh. Fabric is wrong, some of the methods are wrong (it’s even partially machine-sewn). On the other hand, the shape is pretty spot on on me, so that’s a plus. Also, the Re-Make part is pretty good: using trim to cover up damage is a valid thing, bias strips as trim are valid as far as I know, and the handsewing stitches I used (backstitch & fell stitch) are valid.
Hours to complete: No idea whatsoever. Sewing down the trim at one armhole (cca 52 cm) took about 1,5 h, I think?
First worn: In the original state, for the first and the last time to a production of King’s Speech by the National Theatre in Brno (an occasion that seemed to call for an evening dress, so I used the best I had :D). In this new iteration, to the “All in the Garden Green” ball held by Jane Austen CZ on February 25 2017 in Brno-Tuřany. And then many times afterwards, not all of them historical occasions, either.
Total cost: Low. I don’t remember how much any of the materials cost anymore, but in any case, the red fabric was marked down and I only used about half of it, the blue was cheap to begin with and I only used a bit of it, and there wasn’t much thread or yarn used, either. All in all, I’m guessing about 70 CZK ( = less than 3 USD)? The cost would go up if I did it more correctly and used a thinner, historically accurate fashion fabric coupled up with a linen/cotton lining.

Wednesday, 3 March 2021

Analysis of the proportions of a successful Regency dress

So you want to do early Regency but you don't exactly have a columnal figure...?


While searching for some other conversation I've found an old comment of mine in a Facebook group, a comment documenting the relative measurements of my Regency dress compared to my figure. I thought it was worth reproducing as a (more detailed) blog post for future reference for anyone who wishes to achieve this sort of early 1800s columnal style on a more "feminine" figure with bigger hips. Since mine was achieved through trial and error but I'm really happy with how it turned out in the end.


So here goes one person's experience:

I'm wide-hipped, approximately DD-cupped, but pretty slim.

My underbust measurement is c. 75 cm (29,5 inches), my hips are c. 102 cm (40 inches); 1,36 : 1 hips-to-underbust ratio. The vertical distance between the two is c. 40-42 cm (c. 16 inches). My bust span is c. 20 cm (c. 7,5-8 inches).

The dress has rectangular front and back panels, with gathers in the back and trapezoidal gores at the sides (more like side front I guess). The front panel is 24 cm (c. 9,5 inches) wide (= with 2 cm on each side in addition to my bust span). The gores are 18 cm on top and 29 cm at the hem (c. 7 & 11,5 inches). The back panel is 115 cm (c. 45 inches) wide, gathered into the waistline.

So it all adds up to 172 cm (c. 68 inches) at the waistline / underbust level, compared to my 75 cm (29,5 inches) measurement; 2,3 : 1 ratio. A lot of that is taken up in the back gathers. It's a drop-front dress, so there's also some overlap between the side gores and the back panel.

The skirt is 112 cm / c. 44 inches long at the front & sides (slightly longer in the back due to the raised waistline there).

The hem is 2,5 m (c. 98 inches & 2,7 yards) - so it's c. 2,5 : 1 compared to my hips measurement, and c. 1,4 : 1 compared to the skirt dimensions at the underbust level.

Update: I found this post trying to document the circumferences through the centuries, and my 2,5 m seem to fit in pretty well with the era I was aiming for - it's on the larger side actually, but then I suspect most of the museum items are in smaller sizes, as they tend to be (survivorship bias?). You can see how there's a fairly drastic change between 1790s styles and early 1800s styles - that would be the change from a skirt gathered all around to the typical Regency flat front.

All this in a very lightweight cotton sateen. There are tight gathers of the two rows of running stitch kind in the back; about 60 cm (c. 23,5 inches) gathered into about 10 cm (4 inches) - I'm not sure how much exactly it was anymore, this was just a very quick measure at the hem, but 60 cm kind of make sense to me as a number I'd have picked. :D I underlined the thin fabric with a strip of cotton plainweave so it's a bit thicker and not quite as much fabric is taken up in the gathers as it would otherwise take in something as lightweight as my sateen (it's a lot anyway - 6:1 ratio!). Then gentler gathers towards the sides.


Now you may not want to reproduce the exact proportions of my pattern pieces - my narrow front panel is a bit weird to be honest - but hopefully putting it down in exact numbers and proportions like this can help you decide how to proportion your dress if you're struggling with that. :-)

You see the trapezoidal skirt patterns more often on later, 1810s & 1820s dresses, but they do sometimes appear in dresses dated to the earlier, more strictly neo-classical era as well. Based on my own experience, they may well have been an invention to accommodate wider-hipped figures similar to mine who wanted the sleek columnal look with full enough skirts for movement and without putting too many gathers at their underbust level.


Good luck!

Wednesday, 18 November 2020

Just a pair of stockings

I'm finding out this blog has been sadly neglected in the past years and there are lots of things I never posted about.

Like my stockings. Which I already made a couple years ago, for some HSM challenge or other - if I dug through the Facebook albums in the HSM group, I'm sure I'd find it, but I don't particularly care to do it right now.


It's my first attempt at sewing historical stockings (well, second, after a sort of rough mockup of my pattern), and they're nothing special in execution, wonkily sewn and not particularly historically accurate (there's lycra and machine sewing).

But they look the part.

And they contain three different tees, two thrifted, one of which was my orange tee from years ago after it stretched out of shape (and that's why I no longer wear lycra tees because if you don't have a dryer, they do sooner or later stretch out of shape while line-drying.)

The other thrifted tee was just bought specifically to make up for my lack of fabric in my original white tee.

That was my white Latvian tee, made in Latvia, from back in 2011. It got yellowish with use and also a bit stretched out of shape. (Don't believe people who say lycra assures your knits will retain their shape.)

So they are, in a way, a sentimental object.

And I'm currently knitting a wool(-ish) pair for colder days, so I decided these needed to be posted for the sake of painting the full picture.


My garters are two layers of plainweave cotton tape, paired up with vintage ribbon from my grandma. (I could have sworn I blogged about them and other stuff when I got them, but apparently it's one of a myriad of things I never blogged about.) I had ideas of embroidering some satin to put on the tape to make them really pretty, but that never materialised. So far.

Because it's "found materials", one of the ribbons is slightly different from the others. I actually rather like that my ribbons are mismatched and that my stockings are pieced. I often enjoy the mismatched and pieced items in museum collections more, because they have more... character, than the picture-perfect gowns that people are oohing and aahing over on social media...


Which reminds me - I've been pondering joining Instagram because that's where all the cool kids are these days, and when I blog I spend this huge amount of time writing blog posts that no one then comments on. So I eventually started reading their Terms of Use, where they keep talking about how it's aiming to be a personalised and up-to-date service, and yet somehow they fail to mention what it actually is, in the several paragraphs I got through. I backed out again at that point because a service incapable of telling you what it is that feels the need to instead keep wrapping pretty words around the fact they keep tabs on you... probably isn't something I want to sign up for, regardless of how many costuming friends are using it (and regardless of how many online services these days do the same keeping tabs thing). I've never been one of the cool kids anyway, why start now?

Monday, 17 February 2020

Deciphering Historical Clothes: A c. 1840 corset & Drafting a pattern from photos

I've been stuck at home with a flu for over a week. After the first couple of days when I really felt awful, I now feel mostly okay except for a bit of a cough, a bit of a temperature and the fact any sort of physical activity tires me very quickly.
So I'm stuck mostly sitting down and trying to invent ways not to go crazy with boredom and do something more productive at least with my mind.

Which in Marmotaland sooner or later means DECIPHERING HISTORICAL CLOTHES.

I have corsetry on my mind, what with deciding that I need to make myself new Regency stays (my size has changed so much that I eventually figured out altering my old ones was probably more trouble than it was worth, alas). Along the line, I got to wondering about some 1830s-1840s corsets without bust gussets (I always have the 1840s low-key in my mind because the discontinued kacabajka adventures hang over me), and that led me to this c. 1840 corset in the Met.


Atelier Nostalgia (who has recreated it and whose blog post directed my attention back to this particular one) noted that it has no bust gussets. Which she says was unusual but I think it was actually quite common at that particular point in time and soon ceased to be so for some unknown reason - plenty of the c. 1830s corsets are simple "princess seamed" affairs. She also noted that the museum helpfully provided lots of detailed photos.

Those photos are, of course, ideal for deciphering.

Behold my usual messy colour-coded pictures:


Blue is for seamlines between pattern pieces.
Purple is for boning and the front busk.
Red is for the very narrow boning channels which may involve narrow baleen (is it possible to make baleen so narow? I have no idea), or cording, or even reed - which you can totally still use in Victorian corsets! To which this 1863 patent by Lavinia H. Foy attests with this sentence: "Rattan and whalebone strips can be inserted in the usual manner..."
Green is for grainlines. Sorry for making it so pale; I didn't want to cover the details underneath too much with all my scribblings, and went a bit overboard on the transparency. It should be easier to see in the full size. (What's not accounted for in my pictures and what I did eventually figure out is that the front hip gusset is also cut on bias. I am still not entirely sure about the back gusset but I think it might be on straight of grain.)

The corset is made from satin, which is a beast for determining grainlines even in real life, let alone in photos. Luckily, some of the photos are VERY detailed, allowing me to make a better guess, especially because in some places the fabric is a bit worn, which exposes the yarns more and makes it less of a quesswork. Also the lining (see additional photos at the museum site) is plainweave, which also helps; although I think the lining doesn't quite match the outer, it does more or less correspond to it.


What struck me was that the centre front was not cut on straight of grain, and neither was the side piece - leading my train of thought straight back to my Regency stays enterprise and the Bernhardt stays, specifically Fig. F.


There are definite similarities between this corset and the Bernhardt stays when you look closely (aside from the aforementioned, the hip flare is basically just an addition to bring the corset lower down the hips). That got me so excited about this corset as a possible sort of missing link between Regency and Victorian styles that I went ahead and roughly drafted out the pattern for myself in Inkscape, more or less following the principles lined out in Cathy Hay's Corset Making Revolution article. (ETA Nov 2020: Sorry, that's no longer available. The Foundations Revealed website has changed the way it works and there are no free articles now.)

And it worked.

Well, obviously I haven't made a mock-up yet. But my experiment did yield a pattern that looks like a good starting point for that. It's also similar to this possibly early 1850s corset on the Abiti Antichi site (which still has shoulder straps and on the other hand seems to have some sort of proto-opening-busk), so it's probably a very good basic style for the 1840s mid-19th century.


But more than that, as Atelier Nostalgia also noted, it's also a style that you can find it later corsets as well. And not just the 1850s. It looks surprisingly similar in principle to a couple corset patterns in patents from the 1860s and 1870s on the Haabet site.


And, from my browsing of museum collections, it also looks like a style that, with slight variations, carried all the way to the 1880s. Most 1880s corsets tend to have wider fronts, though, and are usually more along the lines of the gussetted or princess-line corsets you can find in commercial patterns. But you can still see elements of this sort of construction even in some later corsets.


The difference being mostly the fact later corsets have opening front busks, cross-lacing, and tend not to go so low on the hips. Many of them also utilise bust gussets instead of the bust seams of this particular style.

All this basically means I've developed a method of drafting a certain kind of Victorian corset pattern that can work, with various alterations, for a period of about 50 years from the end of the 1830s to 1880s! It's different enough from the commercial patterns I'm aware of, and yet ubiquitous enough in museum collections that I think I really hit on something here.


This is what I eneded up with. It will still nead fine-tuning, especially in the underbust area, but it's definitely a workable start.
(The exclamation mark on the left means my division of the waist is imprecise because what I really needed was decimal point numbers and I couldn't do those quite so easily in Inkscape without changing the grid - which is a bother, so I'll get around to that in paper stage. Basically at this point there is zero waist reduction and I think there needs to be at least a little bit of it.
The exclamation mark at the front hip gusset means that particular seamline is in serious need of truing - and the hip gusset will need some slashing-and-squishing after I get around to altering the waist.)


In order not to make this post too long (more than it already is), winding and difficult to navigate, and in order to make it easier to make stuff linkable (I'm not flattering myself to think this will be linked, am I?), I will eventually put the whole drafting method for this particular style in a separate post, probably after I've had a chance to make a mock-up and really see how well it works. Although now that I have shared an actual flat pattern draft, I guess you could also just apply Cathy Hay's method to it without waiting for the next post. :D

And when I get around to physically drafting this pattern, I'll definitely do some sort of further pictorial comparison between it and the Bernhardt Fig. F to prove my point. It's not quite immediately obvious - especially because the distribution of seams is a bit different - and I don't think I'd have thought of it had I not been drafting the Regency stays just before. But that front dip, slight bias in the front and bias on the side (also just slight in the Bernhardt stays) did make me wonder. If you lengthened the two back pieces and the front tip of Fig. F, and introduced hip gussets, you would get something approaching the 1840 stays and all those subsequent styles!


What I will share here regarding the drafting is this: I knew, instinctively, that this drafting method might work because I've done it before with my first Regency stays. I looked at lots of photos of extants. Focused on seamlines and where they sit on the body. Drew myself some technical drawings. And drafted the thing in a grid following my own measurements in a method similar to what Cathy Hay does - except that I used a lot more measurements to make sure it really fitted me.

So yes, this can totally be done just from photos - as long as they are decent quality and you have more than just one view. Look where the seamlines sit on the body. Find the underarm line (3 in my plan below). Find the waistline (C) and underbust line (B - in this case it's a lower underbust). Figure out the grainlines. Go from there.


In this particular case, I was lucky because the museum even provided a flat photo, so I could use that as my rough starting point for a flat plan (and use some common sense to account for the distortion).

If you don't have a flat photo - I didn't for my Regency stays, both because there aren't that many online in the first place and because the stays were an amalgam of many individual garments - draw yourself a sort of gridded flat plan first, not bothering with exact measurements for now. Make several such plans if it helps you to make sure you understand how it goes together.

And then you fine-tune that plan with actual measurements. Make your default horizontal lines the length of the biggest measurement of the main pattern pieces (excluding gussets), minus your preferred lacing gap, and go from there, leaving gaps where your other horizontal measurements are smaller. Or (like Cathy Hay) go with the bust, overlapping your pattern pieces in places where you're bigger (hips).

Meaning that for this particular corset - with its bust seams - I went with the bust measurement for my horizontal lines (and added the gussets for my hip / upper hip measurement, which is slightly bigger than my bust). For my Regency stays, I went with the underbust (because I was using both bust and hip gussets and really needed them to fit snugly at the underbust).

If you're drawing on paper, it may help to start with a scaled down pattern (in pencil!) to see at one glance if you're really going in the right direction. Your scaled down first draft can also double as a draft for your boning layout. (Or do it like I did now and draft your pattern in a grid in Inkscape or similar vector graphics program - that has the advantage of allowing you to correct mistakes cleanly, including the "back" function.)
That draft is your first dry run. It will help you catch any mistakes and things you forgot to take into account before you draft full-scale on paper. (There will totally be mistakes and things you forgot to take into account. On my first run through this pattern, I completely forgot to take into account the bust-to-waist difference in the back, and the fact you want your corset to dip in the underarm area. Among other things.)

And even then, always make mock-ups. :-)


You could apply the method to other items of clothing as well, but what with them not sitting close to the body like a corset does, and involving things like pleats and gathers and sleeves, that will involve even more trial-and-error. But it can totally be done, as Sabine of Kleidung um 1800 and Bránn both demonstrate. Especially if you start with something simpler like an apron, and something in a patterned fabric like a check that makes it easier to determine pattern shapes.

So that's my five cents concerning drafting from photos. And 1840s corsets. Some people seem to think the 1840s are boring. I hope I've just proven they're far from that.

Sunday, 1 July 2018

A historical costumer's progress

It's not going to be an overview for beginners's education / advanced amusement type of post.

It's just a fun little thing I noticed which marks my own progress.

Back in 2011 (whoa), I wrote about watching the Czech TV series F.L. Věk. I wrote also - how could I not - about the costumes.

What I did not mention in the post was that I had looked at the picture I shared there, of the character Márinka in a printed dress, and that I had gone: "Points for trying but that's a roller print and this is too early for that." (Early 1790s, I believe.)


The aforementioned progress is like this:

In 2018, I look at the picture and go: "That's modrotisk!"

Traditional indigo resist print. It's not roller print; it's block print. Even those that look like roller prints.

I still think this particular pattern is probably anachronistic for early 1790s, but now I actually know the technique isn't. :D

Bonus: I can get very similar fabric (or is it really the same?) if I were inclined to recreate the costume and put that kind of money into it (which I'm not, but I do badly want to make a historical modrotisk dress one day). I think the one in the costume got more indigo bath dips than the one the Danzingers are selling now, so I'd probably go with the version from Strážnice... also, how come they have the same printing block?!

... unless, of course, Márinka's dress was a cheaper modern knockoff of the fabric style. Entirely plausible with a TV costume.

(Further bonus: I can show you part of how it's done. If I get my act together and finally finish the post on the workshop in Strážnice I started last August.)

Tuesday, 29 August 2017

#CoBloWriMo 29: Ensemble - The 1802-ish navy blue sleeveless dress and red sleeveless bodice

 
On August 13th, me & my sister went to Slavkov u Brna, aka Austerlitz, for a series of short talks about Empire fashions held in the chateau there (we overslept, and missed church and the first talk :P - but it was some sort of general introduction so I don't think I missed too much, although it probably would have been interesting for my sister.) So I finally met my namesake and Justyna, who had two of the talks - well, I'd actually met Justyna before, at my first Jane Austen ball in Brno, but that was before I knew who she was. :D Her talk, on outerwear and sportswear, was one I was most looking forward to - and it did provide exactly the sort of complete overview I had been missing.

I also wore my Directoire/Empire clothes (calling things based on a 1797 fashion plate and an 1802 portrait "Regency" is too much of a stretch, although I'm keeping it in the tags for simplicity's sake). And we used the historical backdrop of the baroque Slavkov chateau and the impressive classicist church just underneath it for a sort of photoshoot.


The church was built in 1786-89, so it's perfect for my preferred era.


Conclusion: Slavkov is awesome photoshoot backdrop, close to Brno, easy to reach, with family in a village nearby so it can be paired with a visit. It's awesome photoshoot backdrop if you can manage the photoshoot without visitors to the chateau getting in the way, that is...


Taking the photos in the entrance hall may not have been the best of ideas, but that bench was too good to pass up.


The dress is a sleeveless drop-front, which was a mistake. After I made it - which is the usual order of things, isn't it? - I realised all the depictions of sleeveless dresses I'm aware of are drawstring. Also, while drop-front dresses are definitely easier to get into on your own than back-closing ones (I even avoid back zippers, after all!), it's still a bit more bother than a drawstring would probably be.

And I need to rework the arrangement of the chain-loops in the back so that my ties do sit where I want them to sit.


(It's less obvious in this photo than some of those we took at the church, but: the ties currently cut across my pleating in the back because I don't yet have some strategic loops in the raised bodice back.)

Still, dressing for this occasion was less of a bother than usual, because I wore my transitional wrap bra / jumps rather than my (back-lacing, hah) stays.

Also, it's a lot easier now that I was inspired by the Dreamstress' post on bodkins and got myself some large blunt needles to help with my laces and ties.

We took some of the photos in the ladies' restrooms. Because:


The dress is lightweight cotton sateen, this one I bought years ago in the beginnings of this blog. It's more matte than shiny, although it does have a slight sheen to it just thanks to the weave.


Apparently, back then I wanted to overdye it and use it as lining. I'm very glad I changed my mind.


I hereby formally request admission to the Regency Ladies' Wedgie Society.

(You can see here what I meant about the ties not sitting where I want them to.)

For my hairstyle, I did a French braid held up with a haircomb, inspired by this tutorial - without any of the bells and whistles, though, because I knew I'd wear the fichu en marmotte on top of it anyway.


I even managed a curtsey; but that was the last photo before I broke out laughing and could not seriously pose anymore.

I originally made the skirt too narrow (most of the dress was made in a big hurry before an event, and it was my first take on "Regency", made without a pattern of course because that's apparently how I roll). Later, I added narrowly trapezoidal side panels, and therefore also moved more fullness to the back part. That took care of it. It's still on the narrow side, but I think these photos prove it's got a good shape on me.


The church is a super-nice backdrop.


That was wind billowing my skirt, and blowing my headscarf to the front so I had to hold it.