Showing posts with label Patterns (free). Show all posts

Saturday, 15 May 2021

HSM '17 #2: The c. 1800 sleeveless spencer / bodice

No, that's not a mistake: it really is a make from 2017 (in its final finished state). There's really a lot I've never gotten around to blogging about...


Once upon a time, I fell in love with the 1802 portrait of Heinrike Dannecker by Gottlieb Schick, and decided I wanted to make an outfit inspired by it - really possibly my favourite portrait from the era, fashions-wise, as I've already mentioned.

Then later I came across two other portraits involving sleeveless bodices that I took inspiration from: this ca. 1795 miniature by Augustin Dubourg and the 1800 portrait of the Comtesse de Bonneval by Anne-Louis Girodet de Roussy-Trioson which was good for figuring out how the front would sit at a slightly later date than 1795. :-) (Links to Pinterest because the original links are broken.) - Yes, they're both blue worn over white dresses. My colour bias is showing.

I had some fabulously shiny cotton satin upholstery fabric that I had snatched up from a remnant bin and that seemed to want to become this sleeveless bodice. Red! Shiny for evening wear! So wonderful.

I played with the pattern for my transitional "bra" to turn it into a front-lacing bodice, and as I placed it on the fabric, I thought "maybe I could squeeze two things out of this fabric" and pieced the front to accommodate a more tetris-style pattern placement.

I ended up shifting the grainlines in the three front-and-shoulder pattern pieces in comparison to the "bra". Since it was my own experimental pattern it wasn't exactly set in stone anyway but:
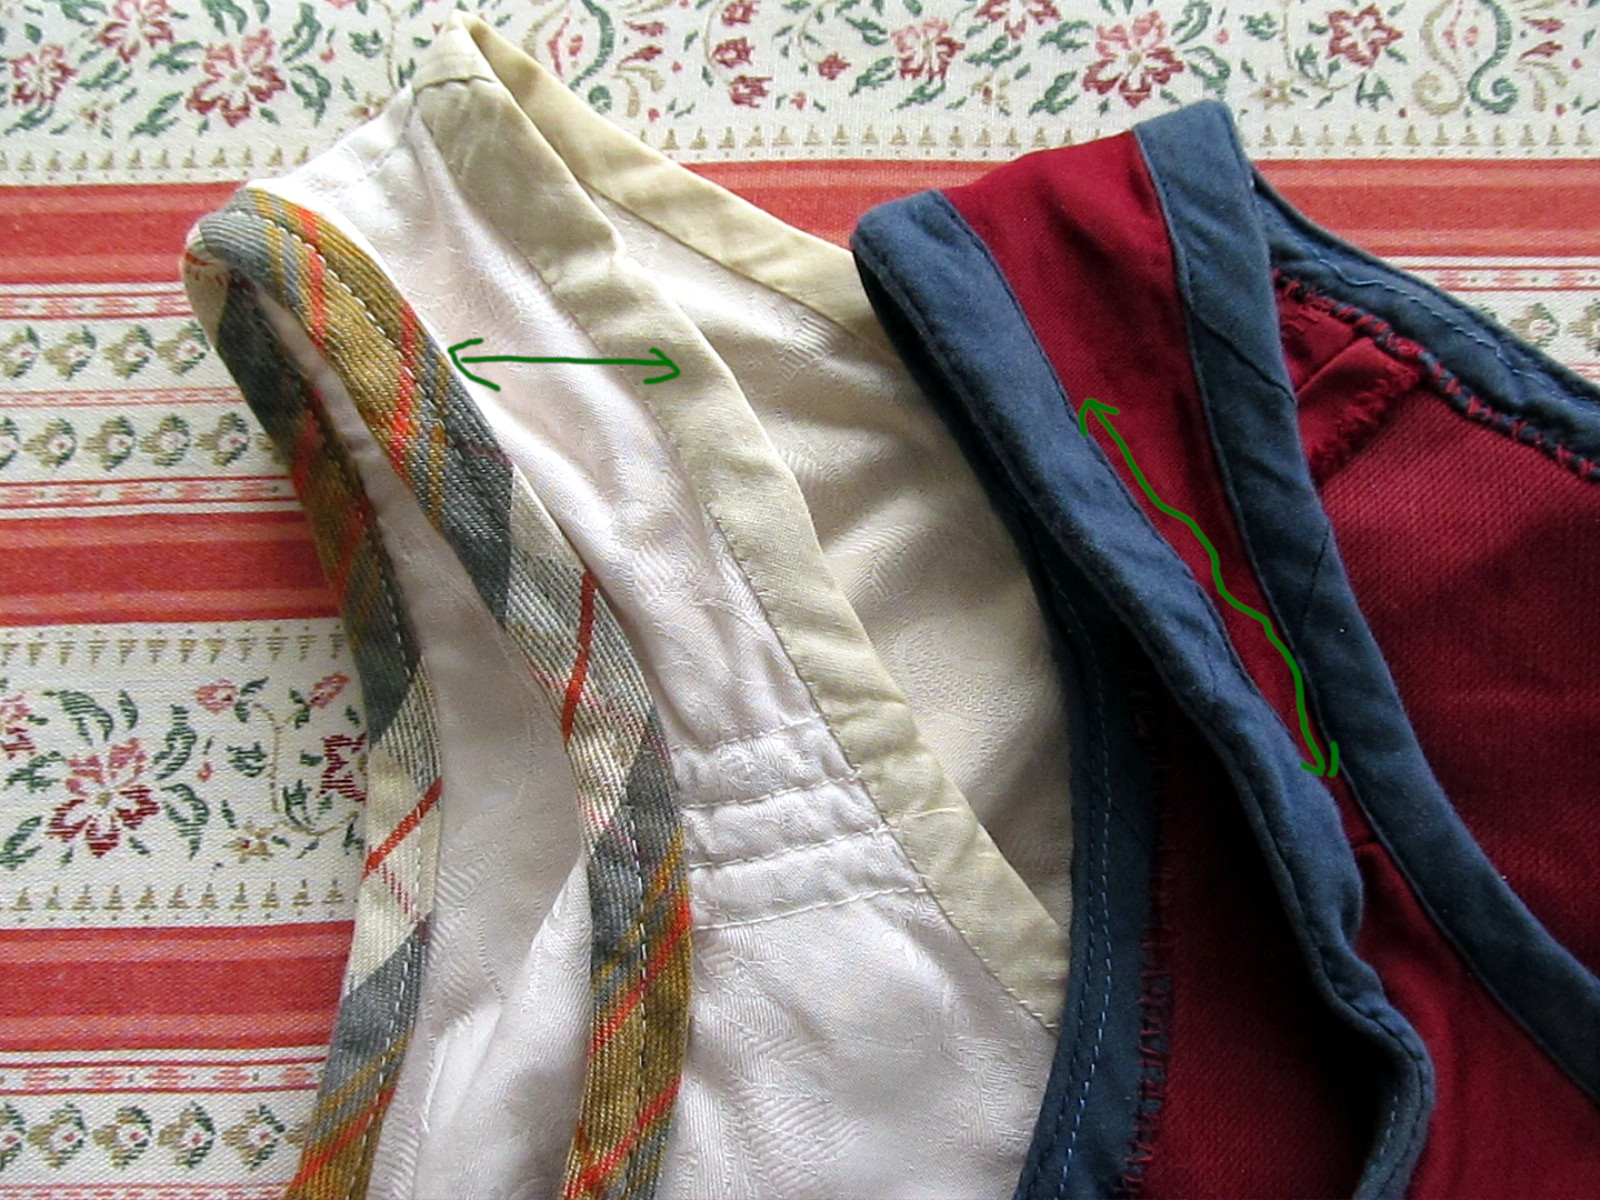
 

I find that shifting grainlines when altering and piecing historical patterns is actually mostly OK - as long as you keep your grainlines mostly the same / symmetrical on both sides of the body, don't remove bias from where it serves a purpose, or don't put bias somewhere you really don't want to stretch out! (Which was actually why I shifted it on the shoulder strap pattern piece: I wanted it lying nicely along the grain. That oddly shaped front bit got its grainlines shifted just for the sake of placement on fabric, though.) When loking at the patterns in the priceless German disertation on the Kostümsammlung Hübsch by Johannes Pietsch, I realised this was done historically, too, with pieced garments. So in that context, you can totally shift grainlines away to your heart's content!

I sewed the bulk of the seams by machine because I was excited and wanted to finish this bodice faster than my previous historical makes (four years is a rather excessive precedent and is stretching one's patience, once the undergarments are already done). Then I got the bright idea to fell stitch / whipstitch (?) the seam allowances down, which turned out to be not very brilliant actually because it resulted in ridges on the outside (thick upholstery fabric). But I kept it that way while I was ahead...

The lacing eyelets were rather a pain. The thick upholstery fabric was so hard to make proper awl holes in! And deciding to use buttonhole silk twist didn't help - it's bulkier. Though also neater, even if mine turned out to be lighter in colour than the fabric.


Thankfully, I decided to lace it with a cord I knitted myself out of cotton crochet yarn, with two stitches only (just like lucet, without a lucet), which is thin enough to pass through the resulting tiny eyelets (a large blunt needle in place of a bodkin helps, though, although it also passes through with more difficulty).


I spaced the eyelets as suitable for spiral lacing - although looking at Comtesse de Bonneval, I clearly could have gone with a regular criss-cross placement; I somehow forgot that part. (I need to work on keeping my inspiration images and sources before me throughout the process of working on things because that sort of thing happens to me far too often.)

I made a thread bar on the inside at the top edge, also from my buttonhole silk, to tie one end of the lace to. The bottom end of the lace I originally usually led back up underneath and tied to the thread bar again as well. When I had a not-lacing-tight kind of day (like when I wore this over a modern bra to church...), I just tied that end off at the bottom. Then that became the norm because my bust had grown about 6 cm since I first made the bodice... and now I've lost some cms there again, though not the full 6. But that's the flexibility of lacing for you! :-)
 
Originally, I only finished all the edges with piping. I don't even think it’s historically correct for the period anymore (maybe it's only an 1810s-onward thing?); and in either case, the folly of using an ahistorical thick upholstery fabric this way became apparent
soon: the fabric ripped / unravelled in several places at the edges in the first wash, before I even had pictures taken. (All the photos in this post were taken during the restorative process or afterwards, I have zero pictures of it in the only-piping state...)

ETA: The problem is that, in order to turn the seam allowances around the curves, I had to cut them quite narrow and - well, the thick fabric is simply not suited to that sort of treatment, together with the thick turn of cloth it puts too much strain on it, and the fact it's a satin (= a somewhat looser weave) did not help...
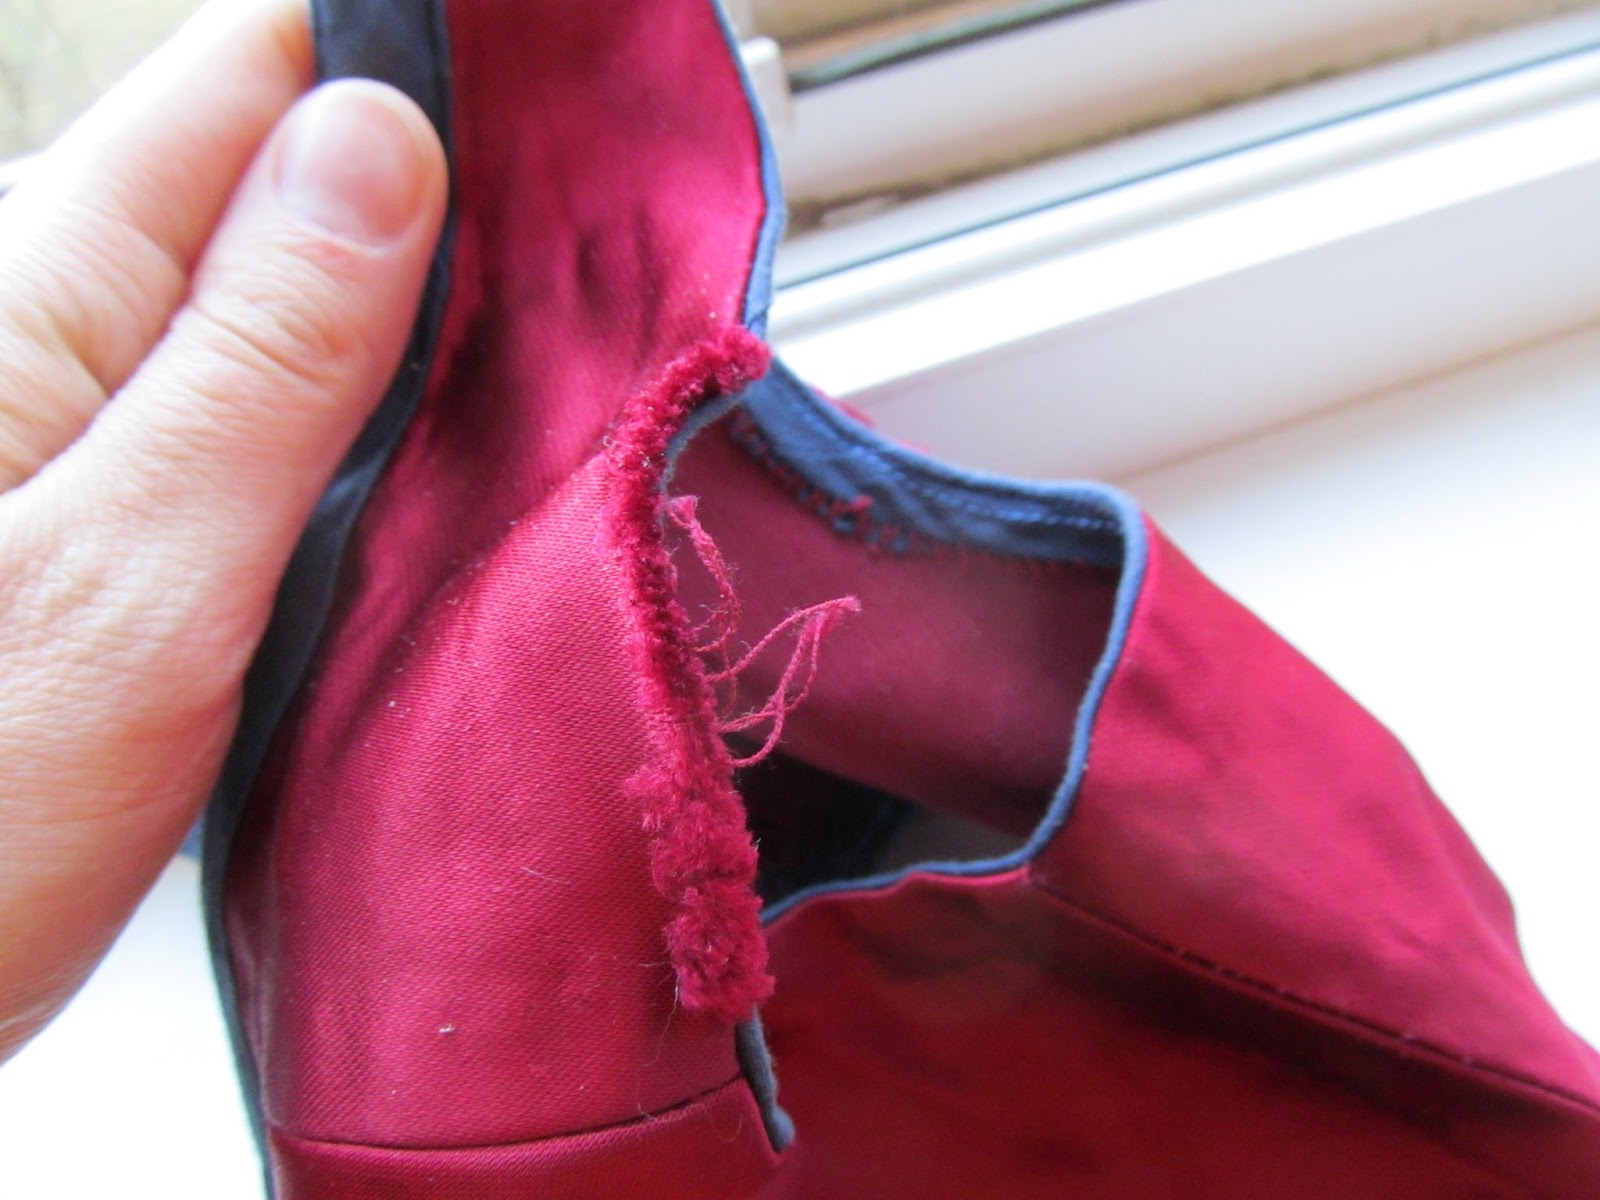
 
I was grumpy about it for a bit, because it ruined the clean look I was going for, but then I caved in and added more trim to save it / cover it up: bias strips whip-stitched (fell-stitched?) to the piping & stitched down with backstitch on the other side, and bias binding at the lacing holes in the front.

So that's the whole of the lesson of not using historically accurate fabric and historically accurate techniques. :P

(More historically accurate fabrics would also likely result in the historically accurate wrinkles one can see in the portraits...) 

ETA: Notice that the bottom edge, which isn't so curvy, survived my piping treatment unscathed, presumably because I did not cut the seam allowance as closely as I did around the curves and the lacing holes at the front openening.


Anyway. Despite the problems, I'm happy with it. I'm particularly happy with the basic shape of the pattern, because that looks exactly the way I wanted it to look. It looks so good I could not believe it when I first saw myself in the mirror and later photos... It sits just like the bodices from the portraits. It's a very satisfying experience to get that result without the jumping board of a pattern taken from an extant garment, with something you just kind of eyeballed.

This is a photo by Páv Lučištník, so far the only good one I have of myself in full Regency getup... my tendency to forget to put on jewellery strikes often! :D So does my "RBF"; for some reason the photos of myself from the events that I know of always make me look bored even when I know I was anything but! Here I was looking at the people dancing and apparently previously tried to take some photos of my own. It's back from the bodice's first outing in its altered state in February 2017. I think I need to revive that headdress style...

So I'm totally going to one day make another one in similarly rather inaccurate cotton velvet, with hopefully more accurate construction techniques. I was originally thinking of a blue velvet remnant, but now there's the Purple HSM challenge and I thought back to the purple velvet... and there's Vanessa's oh-so-pretty printed cotton one... aaand I have some thrifted silk garments intended for repurposing as accessories... so, considering how easy it is to make this garment out of remnants, I suspect I'll eventually end up with a wide choice of sleeveless spencers to spice up my Regency ensembles. :D

I also want to eventually share the pattern (because it turned out so well!), but this post has been in limbo long enough and I don't want to keep waiting till I finish digitising the pattern... especially because it occurred to me that with how simple it is, it may be a good training ground for improving my grading skills...


Just the facts, ma'am:

What the item is: “Regency” bodice / sleeveless spencer
The Challenge, and how this item fulfils it: HSM '17 #2: Re-Make, Re-Use, Re-Fashion. I used trim to save / cover up fabric damage.
Fabric/Materials: Marked down remnant of red cotton upholstery-weight satin (NOT recommended, with emphasis!); navy blue lightweight cotton sateen for trim (pretty great!)
Pattern: My own, an evolution of my wrap stays / brassiere.

Year: c. 1800
Notions: red thread (polyester, I believe), dark blue cotton thread; red buttonhole twist for the lacing eyelets & a thread bar on the inside which I tie the lacing to; dark blue cotton crochet yarn knitted into a lacing cord; thin linen cord for the piping.
How historically accurate is it? Meh. Fabric is wrong, some of the methods are wrong (it’s even partially machine-sewn). On the other hand, the shape is pretty spot on on me, so that’s a plus. Also, the Re-Make part is pretty good: using trim to cover up damage is a valid thing, bias strips as trim are valid as far as I know, and the handsewing stitches I used (backstitch & fell stitch) are valid.
Hours to complete: No idea whatsoever. Sewing down the trim at one armhole (cca 52 cm) took about 1,5 h, I think?
First worn: In the original state, for the first and the last time to a production of King’s Speech by the National Theatre in Brno (an occasion that seemed to call for an evening dress, so I used the best I had :D). In this new iteration, to the “All in the Garden Green” ball held by Jane Austen CZ on February 25 2017 in Brno-Tuřany. And then many times afterwards, not all of them historical occasions, either.
Total cost: Low. I don’t remember how much any of the materials cost anymore, but in any case, the red fabric was marked down and I only used about half of it, the blue was cheap to begin with and I only used a bit of it, and there wasn’t much thread or yarn used, either. All in all, I’m guessing about 70 CZK ( = less than 3 USD)? The cost would go up if I did it more correctly and used a thinner, historically accurate fashion fabric coupled up with a linen/cotton lining.

Wednesday, 7 October 2020

How NOT to draft a women's sloper: Why the FreeSewing.org Breanna sloper for women does not work at all (unfortunately)

In the loquatious manner of old books, the full title of this blog post continues:

Containing therein an explanation of the fundamental importance of the difference between dart width and dart angle.
Or
What shenanigans Marmota gets into when she has too much free time on her hands and wants a quick solution to something (Spoiler alert: It was anything but quick.)

I have to say right ahead that this was written back in May so some of the info about how the FreeSewing.org site is set up here is dated. The problems with the pattern remain exactly the same, though.


I also have to say right ahead that the sum total of my knowledge of programming is a neat zero, so I have no idea how the actual code works and cannot unfortunately fix it.

I do, however, by now know a thing or two about drafting sewing patterns, and about measuring and altering them to make sure they fit - seeing as I'm exactly the sort of non-average person FreeSewing.org is targetting:


In their system, back in May, the closer you were to a standard size, the more your diagram looked like a perfect circle. Mine was a perfect splotch.


So I can at least offer an explanation of why it doesn't work. Why the way they take those detailed measurements (that for the most part do make sense to me) and turn them into this pattern... results in a pattern that does not work at all. Long story short: the very base of the women's sloper is flawed and does not seem to take into account some fundamental truths of sewing and pattern-making.

Namely how you deal with darts and angles.

I hope that this post will both work as a (very detailed) review for other existing / potential users to see exactly why that particular covetable pattern (custom slopers are covetable, right?) doesn't work right now, as well as hopefully help the programmers do things better in the future when it comes to women's patterns. Because I do love the idea of OpenSource patterns!

(And maybe it will also help explain some things about drafting your own slopers. I learned a lot from this myself.)

Monday, 11 May 2020

Throwback: The Andrea blouse and pattern

This dates back to the era of BurdaStyle as a website for OpenSource patterns, and BurdaStyle as a sewing community. Digging back, it seems I made this blouse in 2008? Definitely finished it in 2008. It predates this blog, and was actually one of the first items of clothing I ever made for myself... preceded by a "medieval" (ha-ha) dress and an evening dress! I always had a habit of jumping headfirst into sewing projects without regard for the order of their perceived difficulty ratings. :D

In retrospect, it's absolutely no wonder I've developed the sewing persona and habits I have if, out of the first three garments I ever made for myself, one was drafted based on a scaled draft, one was made from a heavily altered pattern, and one was a completely new design drafted from a basic sloper! There's no way I was ever going to end up the sort of sewist who buys and has to try all the newest patterns! :D

 Old photos demonstrating that my habit of wearing headscarves is already more than ten years old... and that my problem of finding well-fitting RTW trousers is a lifelong one.


That era of BurdaStyle as a sewing community is now definitively gone. Just like the blouse.

The physical object no longer fit me, and was worn and the colours washed out... so recently I cut it up and am in the process of turning it into patchwork pillowcases for my sister. Well, technically, I would be far more in the process of if the project were not currently 180 kms away...

(I wasn't even in the habit of visiting the BurdaStyle site for the past couple of years, so I was surprised to find out it was completely remade when I ventured there recently - I'm not sure when the change happened. But everything is gone. It's truly and fully nothing but a shop now, and as you can guess from the previous paragraphs, I definitely don't need it.)

This blouse was my first pattern of my own, drafted from a basic sloper (provided back then by BurdaStyle user JJ), based on my own design, my own idea, and so it will always be special.


The original idea counted on colour blocking or at least several colours / patterns of fabric, which I eventually scrapped in part because I did not have that many coordinating fabrics of the same type. I also played with the idea of back lacing which I think was quite "in" at the time (also, hey, I've always loved historical costumes), and scrapped that because, well, back lacing isn't very practical.


Also I named it after the little girl who was baptised the day I finished it, so even though I'm not sure how many times I've even met her after that, it is a rather specially named pattern that way.


 And as you can see, I eventually adjusted the back seams to echo the front more. It's much better balanced that way! And more fun! I dislike patterns that have inventive designs in the front and boring standard seam / dart configurations in the back.

The blouse used to have a record on the BurdaStyle site, including a single-size PDF download of the pattern, but as I said, that is now gone, and the record only lives on in the Wayback Machine  - without the PDF (and including my early confusion concerning invisible zippers if you go further back in history :D - it was a regular one). Plus there's my old Czech blog post - now picture-less. ETA: Actually, now that blog is gone, too (the platform is gone), and only lives on in the Wayback Machine.


I forgot to take more photos than these original ones before I took it apart. So you only have my word for all the beginner mistakes I made... such as trimming the seam allowances too fine as I zig-zagged them (together, too, I suspect - you can kind of see that it even affects the fit in the back), before I even tried it on properly. It wasn't that a big problem with this piece, but it's not a habit you want to maintain in general. :D

There's also the matter of my not knowing anything about understitching - so I topstitched around the neckline instead. Again, not a big problem with this casual blouse but not a habit you want to get into in general!

And somewhere between my forgetting some details from the drafting tutorial, the block I used having come without sleeves, and my generally not yet knowing the wisdom of measuring patterns against my own measurements, the sleeves originally ended up a tad too tight - so the underarm gusset was a necessity. One I fell in love with, though. :D


Looking at these photos now, and remembering how I did things compared to what I now know about my usual adjustments, I think I probably should have lengthened it in the upper part / lowered the bust point / raised the shoulder seam, too... I suspect that was also part of the reason the sleeves originally ended up too tight. Not having done that, however, does make the resulting pattern a bit more usable as a general pattern. :-)

... I kind of forgot about my old Czech blog; I don't use it anymore because that old Czech platform is pretty clunky. I now found out there that the thrifted pillowcase from which I made the blouse cost only 5 CZK (!!!), and that the yellow fabric I used for the teeny piping along the sleeves cost 10 CZK (and it cycles back to today because I think I have now used some of that fabric for face masks...).

That blog post is also a bit cringe-worthy because I had frankly no idea what I was doing or how to write about these things in a logical manner. :D

Pattern!


I retained my habit of drafting patterns on newsprint ads for many years after. I don't do it anymore, in part because we don't end up with them in the mailbox anymore (or only rarely maybe?). But it's actually not such a bad habit - if you don't mind drafting on already printed things and having to peer closely to see your lines! :D (I would always do the final markings in a black pen.) Re-using useless stuff isn't a bad thing to do; these days I still have a habit of e.g. taping together office papers printed from one side...


Here's the original pattern, as-is: Drafted at Burda size 38 in the bust (88 cm), c. size 36 in the waist (66 cm), widening back to size 38 (94 cm) or even 40 (98 cm) for the hips; the bodice lengthened in the waist to fit my long torso, and pretty narrow sleeves. No seam allowances.

Download original Andrea blouse pattern

I have an ambition of turning it into a more standard-size multi-sized one - but I'll leave that for the future (because it would hopefully also involve sewing a new version for myself and doing some sort of tutorial!).

Wednesday, 2 March 2016

Deciphering Historical Clothes: Czech wristwarmers from the 1880s

The HSM theme for March is Protection. Looking through my pins of Czech historical garments, I was left uninspired in that regard. (I try to focus on Czech collections in this series now, because it's a good way for me to study and showcase my own country's history!) Until I remembered an item I'd already wracked my head about, an item that protects from cold, so it fits the theme beautifully. Even more so because we've got snow now! Makes my plans of finishing a straw hat or covering an umbrella / parasol kind of less attractive than taking up my needles...

Yep, I'm doing a different thing this time around: I'm looking at a knit garment. Well, an accessory of a super-simple not-shaped kind; but made interesting with lots of colours.

Apologies to my non-knitting readers, and a warm welcome to those who knit. :-) I'm still something of a beginner intermediate in the world of knitting, but things like this inspire me to get better!

There isn't much knitting to be found in Czech online collections so far, sadly; it seems knitting, on the whole, wasn't such a big part of Czech folk culture as it tends to be in colder climates. Or at least not big enough for museum collectors to focus on it. :P But I've still found a few very interesting things (notably, Moravian Wallachian socks!). And one very, very striking thing was this pair of patterned wristwarmers that not only uses seven colours, but one of those colours is even metallic silver!


Not a sort of thing you'd see in Moravian Wallachia, I think. The description on Esbirky unfortunately does not specify where exactly these do come from; but it does give another very helpful detail for deciphering and possible recreating: the dimensions. Cca 20 cm around and 12 cm long. I'd slate them for a woman's wristwarmers based on that, although that's obviously just a guess.

Looking at the opening in the big photo and counting very carefully, I've arrived at the tentative stitch count of 88 stitches: it seems to be somewhere in the area between 80 and 90, and it has to be divisible by four (because of the patterning). It doesn't strike you immediately from looking at the photo, but it also has to be a small gauge (and given the density of the knit, likely a combination of tiny needles and slightly thicker yarn, my favourite way to knit :D): 88 stitches in 20 cm gives me the approximate gauge of 11 stitches per inch. (<= 44 stitches per 10 cm / 4 inches)
The silver threads are somewhat thinner than the wools, and distort the knitting.

It's knitted flat: notice the seaming inside.  UPDATE MANY YEARS LATER: I'm actually not sure what I was looking at - it's just the "step" you get from joining to knit in the round and not bothering to correct for that...


Notice also that the museum photographed one of the wristwarmers upside down. The trick to deciphering a knit garment is first and foremost looking closely and deciding where upside/downside is. Much like the grainlines in woven fabrics. In the above photo, it's the piece on the right that's upside up.

"Fair Isle" knitting is fun and easy to decipher, especially on a "flat" object like this, because you can see the individual stitches clearly and really all you have to do is chart it out... It's the purled beginnings and ends of the knitting that gave me some trouble here, and I had to resort to trying it out.

My first two-coloured attempts weren't very promising:


It actually is super simple - it's just garter stitch - but I still struggle with visualising how multi-coloured purls work... When I switched to my final mock-up in the actual colours, I still had to unravel it a few times, and as you can see, I still made a mistake in the upper section of it (it should end up looking like orange-yellow, not yellow-orange). But it's a mistake small and obvious enough for me to know how it should really go.
(My yellow is much thinner than my green and therefore distorted in that section, but it's correct.)
 

I knitted this test piece with 12 stitches, in yarns calling for cca 3 mm needles according to the maker (most of them are remnants of unknown description, though), on 2,5 mm needles, and it came out 5 cm wide, so for the original size, you'll want to go about half that...

* * *

So, here goes the pattern as deciphered. If there are any experienced knitters among you, used to English charting conventions etc., I would appreciate knowing if this makes sense to you or if you'd write/do some things differently.

If you want to knit this in the round, just knit every "wrong side" row of the garter stitch sections instead of purling them. In my experience, stranded colourwork is easier in the round; but to be historically accurate to the original, flat knitting it is. (AHEM)

Beginning in garter stitch
cast a number of stitches divisible by 4, in red (88 with a gauge of 11 st / inch for the original size)
1. (right side) purl red
2. (wrong side) purl orange
3. (r) purl orange
4. (w) purl 2 stitches in yellow, purl 2 in green, repeat
5. (r) purl 2 stitches in green, purl 2 in yellow, repeat
6. (w) purl red
7. (r) purl red
---------------------------

Stranded colourwork in stockinette
66 rows, starting on the wrong side
(The museum description says the rows of motifs repeat thrice, but they don't really, which was the original reason I tried to decipher it. :D)
Chart starts at the bottom. Grey stands for silver, obviously. The blue dots at the side indicate fifth rows, red dots indicate tenth rows, for greater ease of keeping track and count.


---------------------------

End in garter stitch
1. (w) purl red
2. (r) purl red
3. (w) purl yellow
4. (r) purl orange
5. (w) purl red
6. (r) purl bind off in red

* * *

In case you are wondering, I made the chart in MS Paint by magnifying, utilising the grid and the pencil tool to colour individual pixels in the magnified grid, and then hitting PrintScreen and working with that as my picture afterwards. It's a quick and "cheap" method, and it made charting very easy with opening the MS Paint window on top of the photo of the original. If I do this more often, though, I'd probably prepare myself a grid to colorise (using the Can of Paint tool in that case), skipping the magnifying and PrintScreening, because it comes out a bit small this way (so I can't insert any notes and stuff into the chart itself if they are necessary).


One day, I'll make these wristwarmers and post this pattern to Ravelry so that there will be a traditional Czech pattern out there. *rubs her hands with a supervillain snigger*

Monday, 12 May 2014

1848 Jacket Sewalong: Construction tips and ideas

The introductory post on the history of the garment and my plans
The post with the pattern

What happened to the sewalong, you wonder? I promised in a comment I would put this up on Friday or Saturday. I didn't. I got caught up in sewing the cording in my Regency stays. It takes a lot of time, particularly with handsewing, but thankfully, I quite enjoy the process, maybe precisely because of the slow handsewing. Anyway, immersed in that, I kind of kept forgetting about this.

And because of all that, I'm also going to be honest up front and share the decision I've made: to skimp a bit on historical accuracy with the kacabajka and sew the bulk of seams on the machine. If I want to finish it this year and not four years later, I've got to. I'm making it primarily for fun and style, not any kind of reenactment, so it's not such a problem for me, just for the unrealistic historical geek in me. The construction method will still hopefully be basically historical, and all the finishing handsewn.

* * *

Here's a different photo of the kacabajka, from Národní oděv roku 1848 by Mirjam Moravcová - it's the same frontal view, but it offers a better view of the sleeve braiding (if you're ambitious enough for that; I'm not) and also of the inside of the sleeve. That inside makes me wonder, but more on that later...

* * *

So, what is the construction method? My preliminary research (read: asking people who know better) tells me the jacket would be flatlined. Flatlining is a method that sounds very fancy and isn't really fancy at all. It is, actually, a very simple matter of cutting the lining exactly the same as the outer fabric and then treating them as one (so you could also see a similar method referred to as interlining or underlining these days).
  • Here's an exhaustive yet simple explanation and tutorial from The Dreamstress - including how to treat darts, which applies to our pattern.

Saturday, 19 April 2014

An Easter gift for you: Free pattern for a 1848 jacket aka kacabajka, and sewalong

So, the 1848 kacabajka. The one I have a pattern for.


Want that pattern? You can have it. You can have it for free, as a multisize printable PDF.

There are, of course, catches, because I'm by no means a pattern-making expert. But it's free! Well, free provided you don't count additional work as cost. Practically free! You can make yourself a mid-19th century jacket, or one in the style, and you don't have to pay for the pattern, or painstakingly resize it from a tiny draft. That's good, right?