Showing posts with label Tutorials. Show all posts

Tuesday, 17 November 2020

Drafting sewing patterns in Inkscape: Setting up your grid

If you want to draft patterns in Inkscape (which is a free vector aka line-drawing program, aka the free alternative to Illustrator), your best bet is to start by setting up the auxilliary grid. I find that with the help of grids, I can turn paper patterns digital even without mucking about with scanners (which I don't have myself) and the correct resolution - more on that later, hopefully. But the best part for us historical costumers? If you set up your grid right, you should be able to do scaled patterns or draft those block / apportioning rulers drafts straight into your own measurements. (With the caution that things like bust cup sizes still won't enter into it - always do mockups.)

Although that's a step too far if you don't yet know how to set up the grid to your specifications. Which is something I've only just discovered how to do properly myself, so I'm happily sharing.

I'm sure there are other tutorials for this out there; but I often find it's easier to read tutorials written by someone coming at the problem from the same angle as you... so here's from a pattern-drafter and historical costumer to others.

Here's my sleeveless spencer pattern, digitised with the help of Inkscape grid, still missing its side piece for some reason. I'll have to look into why I stopped at that point; I suspect it's because I lost the paper pattern...

Now, up front, I'm Czech and my Inkscape is in Czech, so sadly I'm not always sure about the exact English terminology. If you have the same version of Inkscape, things should hopefully all look the same, though. Mine is 0.92.2 (5c3e80d, 2017-08-06). (Which reminds me maybe I should look for an update.) You should find yours in the Help section under About or some such.

So, yes, I've only just figured this out properly. In the post about drafting a corset from pictures, I mentioned that I had trouble switching my grid to milimetres... It's because when you change units, Inkscape is clever and retains the dimensions of your previous grid! :D

Setting up your grid is easier when you work in metric. You don't usually have to worry about divisions much - Inkscape works with decimal numbers, and your units work with decimal numbers, so it's quite easy.

Inches require more math and theoretical mathematical thinking. Which goes to show that inches are an older unit from a time when people just did things with physical measures that could be folded in half, instead of with mathematics in their heads...

So, to set up a grid for the first time, you go to File Properties, under the Grid menu, and set up a grid by choosing the type of grid you want (apparently it's "Rectangular" in English) and clicking "Create new".

(BTW: If you want to draft hexagonal patterns for patchwork, the other type of grid can help with that - which is something I should have realised about a month ago when I mucked about and struggled with trying to draft out the Golden Wedding Ring block...)

Make sure you have checked that the grid is turned on and visible (important!). The last option says something like "snap only to visible grid", which means that if you zoom out enough that you can only see your major, red lines, your nodes will only snap to the red grid.

And then you define the exact properties you want your grid to have.

Once you have once set up a grid, you can just turn it on or off, and just change the properties as needed - unless you want the other type of grid, or unless you removed / deleted it somewhere in the process, in which case you have to create a new one again.

This is how I get a "milimetre paper" effect with my unit being milimetres:


You go to the Grid menu on the right, choose your unit, and then decide at what intervals you want your lines to be. As you can see here, I chose to have my basic, blue lines at 1 mm and my major, red lines at 1 cm. 1 cm is 10 mm, so that's easy. Your basic lines will be at every 1 whole unit, in both directions (along the X and Y axes), and your major lines will be at every 10 lines (that's the last setting there at the bottom).

You can also check (bottom left) that you want your grid to display only as dots rather than lines. But personally I find the lines much easier to see and work with.

Note that whenever you change any of those numbers in the menu on the right, you have to hit Enter or click in another menu "window" for the change to take place. Other than that, it's pretty straightforward.

Where it starts to get a bit confusing is when you decide to change units. If I switch my units to cm, I get this:

Suddenly my lines are at every 0,1 of my unit (since 1 mm is 0,1 cm). My major lines are still at every 10 lines.

This is why I had trouble getting mms out of my grid when drafting my corset pattern - I did not notice that the numbers had changed when I switched units, so I could not understand why the grid resolutely stayed the same...!

(You could also change where your grid is centered on the X and Y axes. Those are automatically centered in the left bottom corner of your page. Messing with that is more trouble than it's worth for our purposes - we don't need that because frankly the page does not enter into the drafting process at all the way I do it - except maybe as a rough gauge for how many pages the printed pattern will take. If for some reason you wanted to change where your grid is centered, you would have to know the exact coordinates of the point where you want to move it.)

Of course, you don't have to have your major lines at 10. I can do a "half-centimetre" version by setting them up at 5 mms:

The only thing that bothers me about this system is that I'm limited to two types of lines, so I can't have both a detailed "milimetre paper" and mark 5 or 10 cms as well. If I want that type of super-helpful grid, I have to add more lines manually... which can interfere with my drafting a bit as those "objects" get in the way. Maybe there's still a way around that but I haven't figured it out yet...

Now, inches. As I said, inches require more math.

To help you, the various divisions translate into decimal numbers like so:

1/2 = 0,5

1/4 = 0,25

1/8 = 0,125

1/16 = 0,0625

And if you're math-and-numbers-challenged, you can write down those numbers or print them out on a piece of paper to stick at some place where you'll have it in sight and won't lose it.

(You can get those numbers easily with the help of a calculator by dividing 1 : your division number. If you need, say, 3/8, you then just multiply your 1/8 decimal number by 3... But part of the point of setting up our grids in Inkscape is that you avoid that further multiplication and just use your grid as a ruler.)

So if you want an inch grid divided down to sixteenths of an inch, you set it up like this:

With your basic lines being the decimal number for 1/16 (i.e. 0,0625) and your major lines at every 16 lines.

Just for fun: Because Inkscape goes that detailed with its decimal numbers in these settings, you can go extra-detailed with... what is it called, thirty-secondths?

And now you can give Vanessa's tutorial a whirl regardless of whether your pattern draft uses cms or inches.

As a teaser for how you would do the apportioning rulers stuff: Your X and Y measurements don't have to match.

Here's the same grid in inches:


So... yeah... just with some help from a calculator (you most likely have one on your phone), you can totally do the apportioning rulers drafts to your own measurements. Or create your own apportioning ruler / tape measure for doing it by hand. But more on that at some later point...

Sunday, 10 May 2020

A simple trick for clipping / notching seam allowances


It's another thing I learnt from Bilikis. She doesn't even describe it; she just does it whenever she notches seam allowances (so it usually ends up being sped up!).

When you have a curved seam that needs to have the seam allowance clipped into / notched, it can be a tedious and slightly perilous job. But if you fold your piece at the spot where you need to clip, and cut into your seam allowance along the fold, both sides of the triangular notch at once like this...

 ... it goes much faster and it's much easier to ensure you don't snip all the way into your seam (without needing to bring a craft knife into your sewing room and move your project to a cutting mat!)

Really simple, eh? :-) It barely rates the name of tutorial but... it's supremely helpful, and clearly isn't common knowledge, so let's tag it with that, too.

Monday, 7 August 2017

#CoBloWriMo 7: Made for someone else - Making my sister's Wallachian shirt

The most recent "for someone else" project is my sister's Moravian-Wallachian shirt, which has already gotten some wear but actually awaits a re-do of the neckline gathers because they were done in a hurry before an event... Possibly also a re-do of the sleeves, because they are very long now. (It's a game of tug between what I think is correct and what she thinks will look good on her.)

So I'll just share some making-of now. That's okay; it's perfectly in keeping with my current wish to post more of the making-of.

It's mostly the collar; the rest was done in the evening without good photography light at a point in time when both my pairs of camera batteries were de-charged and I was taking photos with my phone... which isn't that good with lower light levels.

The embroidery is my sister's doing, though.


I'm very much indebted for the ideas of how to go about making one of these shirts to this Czech webpage. It actually covers the shirt - rukávce - of a very different folk costume, one from Uherský Ostroh and surroundings. In that area, folk costumes are much richer than they are in Wallachia. But the basic "skeleton" of the item is very similar, so I was very glad to have that starting point on how it goes together (since it's rather different yet from all the various historical items I've come across over the years).

Rather than have one big pattern piece for the body and tear into it and sew the sleeves into the tears like that tutorial does, though, I used separate front pieces and a back piece, because that seemed easier to make (though I now have my doubts), and to stack onto the fabric for cutting, Tetris-style, with all the smaller pieces and all the pieces for my own rukávce. It turned out it was a good thing we saved a lot of fabric this way, because it turned out I had calculated some of the pieces too small... my sister's shoulder pieces ended up being much bigger than originally drafted, in order to get the dropped-shoulder style she wanted.


Our fabric is lightweight cotton, crisp but with some drape; it's plainweave, but I think the warp and weft are slightly different thicknesses, so it has a slightly different structure than your regular plain weave does. It's really nice to work with, though, and has, I think, exactly the sort of hand this project needs; although originals would have more likely been linen, in the 19th century. (We bought the fabric in Kars on Cejl/Tkalcovská in Brno, back in March - I don't suppose they still have it...)

Despite the regional difference and the differences I introduced myself (I wasn't able to find out how exactly Wallachian ones would have been cut); it's still that basic style of the shirt from the tutorial: rectangular body; two squares or rectangles (I went with squares) for the shoulders - or four, if you want to strengthen that area, which I'm realising is another thing I forgot to do; two smaller squares for underarm gussets; two rectangles for sleeves; one small, long, narrow rectangle for the standing collar.

And because things like this are always better explained with pictures - something along these lines:


This is the most basic shape likely used in the Vsetín area, with variations being just in sleeve shapes. Width and length will differ, some gussets are rather longish triangles creating a more tapered sleeve, and some sleeves, rather than just being gathered towards the bottom, have a separate ruffle at the bottom. (They generally do have a ruffle, but it is often created - like my sister's will be - just by a drawstring running through the sleeve. I'm going to be different and, following my conclusions about a 1937 depiction, I'll only have the sleeve gathered into a narrow cuff, no ruffle.)

Some other areas (like Rožnov pod Radhoštěm) have a flat-lying gathered collar with a lacy / whitework edge, rather than this simple standing collar, like the one here.

I started out by constructing the collar. It's folded lengthwise, as I indicated above; one side is embroidered. Handling the fabric, I realised it needed strengthening, so I cut out another strip of fabric, this time in some old thin downproof ticking (it's softer and thinner than downproof ticking usually is, which made it a perfect lighweight, pliable interfacing for my lightweight fabric). The idea of using downproof ticking as interfacing is indebted to a member of the Historical Sew Fortnightly Facebook group; I've forgotten whom. (I'm going to run with the idea and also use it - the normal kind - to non-accurately interface my sister's bodice, because we really want it to sit smoothly.)


I also folded the ticking in half, and sewed it inside the collar with a longer basting stitch along the folded edge, on the inside side.


Then I sewed the sides of the collar pattern piece, wrong sides out, and turned it and pressed it.


And then I measured it out in quarters and marked them with pins, in preparation for the gathered neckline.


On to the body. I sewed a shoulder piece between the back piece and a front piece, like this:


I only pressed the seam allowances towards the shoulder piece, not finishing them, because the idea was that another shoulder piece would be sewed on the inside towards the end... well, that didn't happen then in the hurry. :P

The shoulder piece is again embroidered, at the bottom edge.


Me & my sister spent a lot of time poring over scavenged images trying to figure out what the embroidery would be like near Vsetín, and then we ended up designing our own going just for the feel of it (and our own tastes); because historical sources I found were low on shirt embroidery patterns, and modern ones are often machine-made...

... but at least I figured out that the cross-stitch embroidery that's sometimes seen was a relatively new and "lazy" development; which was lucky because my sister (who's the cross-stitch embroiderer in the family) found out cross stitch on this fabric was too much of a bother.

And now we're at the end of what I can show you now: with the underarm gusset. Following the above-linked tutorial, I sewed the underarm gusset about 5 cm (not counting seam allowances) bellow the shoulder piece, between the front and back pieces, and flat-felling the seams and sewing up the side seam at the same time.


Rukávce are typically open in the front, closing with hooks and eyes or buttons at the collar and then crossed over and held just by the bodice worn outside. For my sister, though, I sewed up the front, too, leaving just a slit; inversely, she wanted to leave the neckline open. I took pictures of that front seam and slit, too, but they were too blurry. :P After that, I was in too much of a hurry to take photos. So, to be continued with my own shirt and the alterations I shall make for my sister, later...

Wednesday, 2 March 2016

Deciphering Historical Clothes: Czech wristwarmers from the 1880s

The HSM theme for March is Protection. Looking through my pins of Czech historical garments, I was left uninspired in that regard. (I try to focus on Czech collections in this series now, because it's a good way for me to study and showcase my own country's history!) Until I remembered an item I'd already wracked my head about, an item that protects from cold, so it fits the theme beautifully. Even more so because we've got snow now! Makes my plans of finishing a straw hat or covering an umbrella / parasol kind of less attractive than taking up my needles...

Yep, I'm doing a different thing this time around: I'm looking at a knit garment. Well, an accessory of a super-simple not-shaped kind; but made interesting with lots of colours.

Apologies to my non-knitting readers, and a warm welcome to those who knit. :-) I'm still something of a beginner intermediate in the world of knitting, but things like this inspire me to get better!

There isn't much knitting to be found in Czech online collections so far, sadly; it seems knitting, on the whole, wasn't such a big part of Czech folk culture as it tends to be in colder climates. Or at least not big enough for museum collectors to focus on it. :P But I've still found a few very interesting things (notably, Moravian Wallachian socks!). And one very, very striking thing was this pair of patterned wristwarmers that not only uses seven colours, but one of those colours is even metallic silver!


Not a sort of thing you'd see in Moravian Wallachia, I think. The description on Esbirky unfortunately does not specify where exactly these do come from; but it does give another very helpful detail for deciphering and possible recreating: the dimensions. Cca 20 cm around and 12 cm long. I'd slate them for a woman's wristwarmers based on that, although that's obviously just a guess.

Looking at the opening in the big photo and counting very carefully, I've arrived at the tentative stitch count of 88 stitches: it seems to be somewhere in the area between 80 and 90, and it has to be divisible by four (because of the patterning). It doesn't strike you immediately from looking at the photo, but it also has to be a small gauge (and given the density of the knit, likely a combination of tiny needles and slightly thicker yarn, my favourite way to knit :D): 88 stitches in 20 cm gives me the approximate gauge of 11 stitches per inch. (<= 44 stitches per 10 cm / 4 inches)
The silver threads are somewhat thinner than the wools, and distort the knitting.

It's knitted flat: notice the seaming inside.  UPDATE MANY YEARS LATER: I'm actually not sure what I was looking at - it's just the "step" you get from joining to knit in the round and not bothering to correct for that...


Notice also that the museum photographed one of the wristwarmers upside down. The trick to deciphering a knit garment is first and foremost looking closely and deciding where upside/downside is. Much like the grainlines in woven fabrics. In the above photo, it's the piece on the right that's upside up.

"Fair Isle" knitting is fun and easy to decipher, especially on a "flat" object like this, because you can see the individual stitches clearly and really all you have to do is chart it out... It's the purled beginnings and ends of the knitting that gave me some trouble here, and I had to resort to trying it out.

My first two-coloured attempts weren't very promising:


It actually is super simple - it's just garter stitch - but I still struggle with visualising how multi-coloured purls work... When I switched to my final mock-up in the actual colours, I still had to unravel it a few times, and as you can see, I still made a mistake in the upper section of it (it should end up looking like orange-yellow, not yellow-orange). But it's a mistake small and obvious enough for me to know how it should really go.
(My yellow is much thinner than my green and therefore distorted in that section, but it's correct.)
 

I knitted this test piece with 12 stitches, in yarns calling for cca 3 mm needles according to the maker (most of them are remnants of unknown description, though), on 2,5 mm needles, and it came out 5 cm wide, so for the original size, you'll want to go about half that...

* * *

So, here goes the pattern as deciphered. If there are any experienced knitters among you, used to English charting conventions etc., I would appreciate knowing if this makes sense to you or if you'd write/do some things differently.

If you want to knit this in the round, just knit every "wrong side" row of the garter stitch sections instead of purling them. In my experience, stranded colourwork is easier in the round; but to be historically accurate to the original, flat knitting it is. (AHEM)

Beginning in garter stitch
cast a number of stitches divisible by 4, in red (88 with a gauge of 11 st / inch for the original size)
1. (right side) purl red
2. (wrong side) purl orange
3. (r) purl orange
4. (w) purl 2 stitches in yellow, purl 2 in green, repeat
5. (r) purl 2 stitches in green, purl 2 in yellow, repeat
6. (w) purl red
7. (r) purl red
---------------------------

Stranded colourwork in stockinette
66 rows, starting on the wrong side
(The museum description says the rows of motifs repeat thrice, but they don't really, which was the original reason I tried to decipher it. :D)
Chart starts at the bottom. Grey stands for silver, obviously. The blue dots at the side indicate fifth rows, red dots indicate tenth rows, for greater ease of keeping track and count.


---------------------------

End in garter stitch
1. (w) purl red
2. (r) purl red
3. (w) purl yellow
4. (r) purl orange
5. (w) purl red
6. (r) purl bind off in red

* * *

In case you are wondering, I made the chart in MS Paint by magnifying, utilising the grid and the pencil tool to colour individual pixels in the magnified grid, and then hitting PrintScreen and working with that as my picture afterwards. It's a quick and "cheap" method, and it made charting very easy with opening the MS Paint window on top of the photo of the original. If I do this more often, though, I'd probably prepare myself a grid to colorise (using the Can of Paint tool in that case), skipping the magnifying and PrintScreening, because it comes out a bit small this way (so I can't insert any notes and stuff into the chart itself if they are necessary).


One day, I'll make these wristwarmers and post this pattern to Ravelry so that there will be a traditional Czech pattern out there. *rubs her hands with a supervillain snigger*

Saturday, 19 April 2014

A new cover for my mobile phone (and a partial tutorial)

I sorely needed a new cover for my mobile phone. I made one about four years ago and it was no longer fit for polite company.

So, that's what I've just done. Made a new cover for my mobile phone. With felt inside to protect the phone.


It's not perfect - it's only the second one I've ever made, and the first I've done with felt and on machine, and there's some fiddly stitching around corners in very limited space that I really could have done better... among other things. But the first one lasted me for four years, so hey, not bad.

Although towards the end, the first one looked like this:


So yes, I definitely needed a new one.

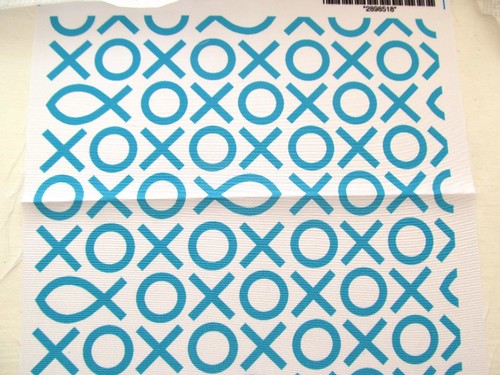
I got very lucky with the fabric. Some time ago, Spoonflower did a promotion on a new fabric - it's called Silky Faille, which of course means there's no silk in it at all and it's all polyester. Anyway, you could get a free swatch of it, so I used that opportunity to finally get myself some of my favourite design.

I mean, my favourite design of mine. I have several up on Spoonflower, but never got around to ordering any, because money and international shipping and who knows what else. Which, of course, in Spoonflower's policy meant that no one else could order them either, so it was all just a mental excercise.

But thanks to this, there's now one up that you can order yourself! And now they offer the prints in wallpapers and gift wraps and decals as well, so if you're not into sewing, you can still get yourself, for example, a gift wrap with tic-tac-toe and some fish pictograms. I'm quite proud of this idea, and it turned out very well.

Tic-tac-toe fish 1 

End of shameless self promotion.

That photo above is the swatch I received. The blue is a very nice deep, rich turquoise blue (almost teal), so I was very satisfied - I was afraid the colour of the printed fabric would be blander than on screen (as it apparently happens with some colours), but no, it's actually a bit more saturated than on my screen, so it should last well.
And as I looked at the swatch, I thought it was perfect size for the new mobile phone cover that I so desperately needed.

As it turned out, it was not only perfect size, the spacing of the pattern was more or less perfect, too!


This here is my very simple pattern. You need the width of your phone (in my case, I went with 4,5 cm), the height of it (I went with 10 cm, which was slightly more than the actual height), and the thickness (2,5 cm - I also store an additional Mini SD in its case in my cover, so the thickness is more than the actual thickness of the phone).

Cut the same from felt. You can leave very narrow seam allowances with felt if you're confident you'll manage them under your sewing machine foot. I did. I'm one for minimum seam allowances and minimum fabric waste.


Sew the bottom corners first.


Then the bottom seam.


And then the side seam.


And make it nice and smooth.

Very quick, very simple. Do the same with your outer fabric. The faille frayed a lot, so I stitched it with a zig-zag stitch to prevent the fraying.

What follows is the part that I think I could have done better. There must be a better way to do it. Anyway, what I did was put the felt into the outer shell, stretch it all to fit together - I put in the mobile phone and the SD case to make it fit together the way it should. And fold down and pin the seam allowances of the shell to the felt.


This was where it got very unscientific and messy. I could not figure out which side to pin from, and which side to sew from, and so on. And at the bottom corners of the flap, I had to clip the fabric so I could fold it, and now I have exposed clipped bits there.

Anyway, I took the phone out again and topstitched it together (from the inside). And that's how I made my felt-lined mobile phone cover. Feel free to steal the idea, and feel free to order the fabric and use it for yours. :-)

Oops. I slipped into shameless self-promotion again.

Friday, 9 March 2012

A 1935-ish hairstyle for long hair

I had always thought that I could not do 1930s with my long hair. Until I saw the 1935 Czech(oslovak) comedy Ať žije nebožtík ("Long Live the Dead Man") and squeeled in delight over Adina Mandlová's hairstyle there.


Hairstyling has never been my strong suit; I only came up with this on Tuesday and it still needs to be perfected; it's also not quite the same as the hairstyle in the film. I have no idea how to achieve those waves without some fancy equipment, for one thing.
And I'm very much indebted to all those hairstyling tutorials I've looked through and watched over the time, particularly to Gertie's Heidi braids tutorial - this is just a variation on that, so I suggest you watch her tutorial to get a better idea of what's going on here. As I said, hairstyling has never been my strong suit. :-)

You only need a comb, hair elastics (some thinner ones) and bobby pins for this. (At least, that's the basic set up - you may want to use other things, like some hair gel for keeping your hair tidy, if you know how to work with them. I don't.)

You start by dividing your hair into four portions. Comb and clip back the front two. Divide the two back portions into three sections again and braid, always starting with the inner section (left for the right braid, right for the left braid) and braiding towards the front. This may seem trivial, but it later helps the crown lie smooth against your head.


Tie off with hair elastics. Now watch Gertie's tutorial if you haven't already and create a braided crown on top of your head following her instructions.

Or just pin it as seems natural to you.


Now it's time to work the originally front, now back, portions.

Again, divide each portion into three sections and braid. (You may want to comb them smooth again before doing that.) This time, start with the outermost section and braid under - so in this photo, imagine starting with the right section and swapping it with the middle one, with the right section going over the middle one as you look from the back. Does that make sense?

(I tried to photograph it, but it did not show. Photographing a hairstyling tutorial with self-timer is one of the craziest things I've done to date. Particularly because every time I was taking a photo, I had to squat down in front of the camera, because it was lower than my head. I don't know what I would have done without a tripod. Given up on the tutorial, most probably.)


Do not braid up, though - that was just to show the three sections for a visual backup. Braid down, at least the beginning of the braids (I do find it easier on my arms to braid the lower portion of a braid up). All this, again, will help the braids lie smoother against your head.

And now the fun part: the bun at the nape of the neck is simply a knot.


Tie a knot, tuck the loose ends underneath and pin in place (four, one from each "corner", suffice for me).

It looks rather messy on the photo... as I said, it needs perfecting. I suspect Adina Mandlová's bun was made differently. Any better ideas?

But in spite of the shortcomings, I already love this updo. It's better than the plain Heidi braids for me - the crown is not so thick, it lies smoother against the head and is easier to pin in place. And it can be varied into a Regency-style updo! Which I will show you one day, too.

It has only one shortcoming that cannot be perfected with time: because of the crown, I cannot wear my hats with this updo.

But it's still fun.