Showing posts with label Refashions. Show all posts

Saturday, 15 May 2021

HSM '17 #2: The c. 1800 sleeveless spencer / bodice

No, that's not a mistake: it really is a make from 2017 (in its final finished state). There's really a lot I've never gotten around to blogging about...


Once upon a time, I fell in love with the 1802 portrait of Heinrike Dannecker by Gottlieb Schick, and decided I wanted to make an outfit inspired by it - really possibly my favourite portrait from the era, fashions-wise, as I've already mentioned.

Then later I came across two other portraits involving sleeveless bodices that I took inspiration from: this ca. 1795 miniature by Augustin Dubourg and the 1800 portrait of the Comtesse de Bonneval by Anne-Louis Girodet de Roussy-Trioson which was good for figuring out how the front would sit at a slightly later date than 1795. :-) (Links to Pinterest because the original links are broken.) - Yes, they're both blue worn over white dresses. My colour bias is showing.

I had some fabulously shiny cotton satin upholstery fabric that I had snatched up from a remnant bin and that seemed to want to become this sleeveless bodice. Red! Shiny for evening wear! So wonderful.

I played with the pattern for my transitional "bra" to turn it into a front-lacing bodice, and as I placed it on the fabric, I thought "maybe I could squeeze two things out of this fabric" and pieced the front to accommodate a more tetris-style pattern placement.

I ended up shifting the grainlines in the three front-and-shoulder pattern pieces in comparison to the "bra". Since it was my own experimental pattern it wasn't exactly set in stone anyway but:
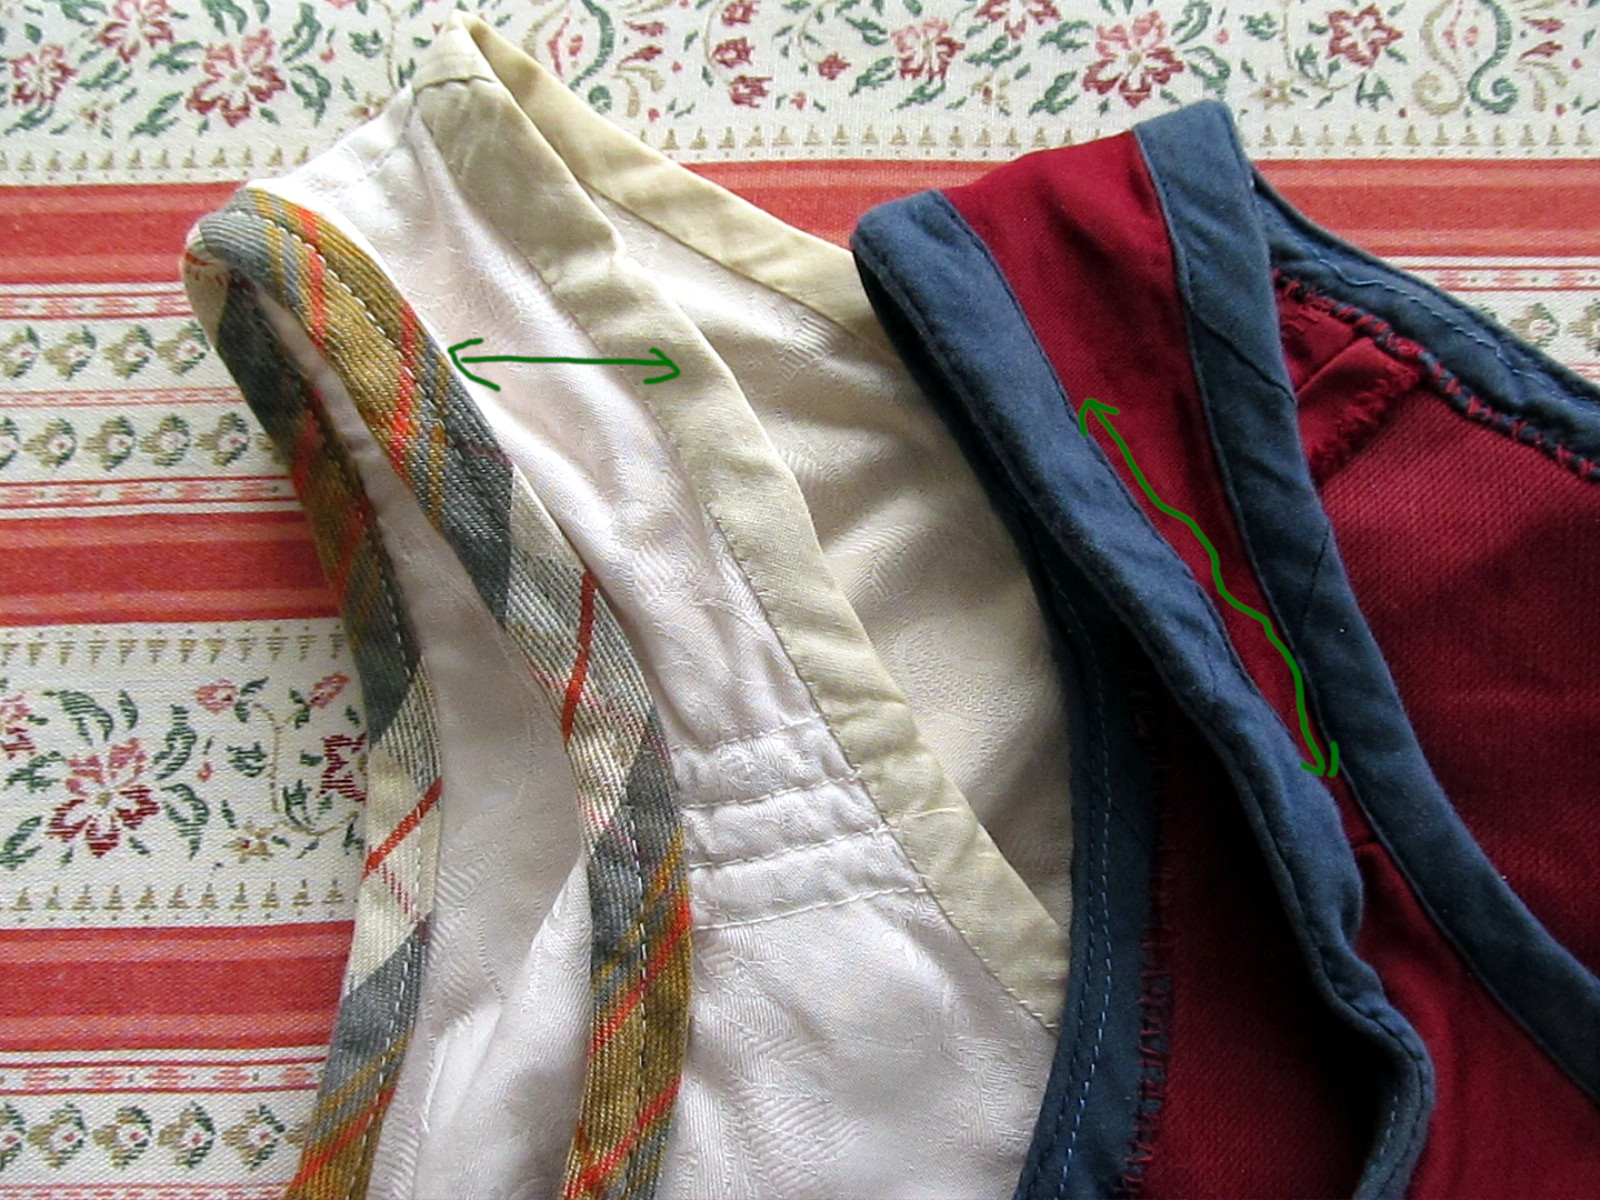
 

I find that shifting grainlines when altering and piecing historical patterns is actually mostly OK - as long as you keep your grainlines mostly the same / symmetrical on both sides of the body, don't remove bias from where it serves a purpose, or don't put bias somewhere you really don't want to stretch out! (Which was actually why I shifted it on the shoulder strap pattern piece: I wanted it lying nicely along the grain. That oddly shaped front bit got its grainlines shifted just for the sake of placement on fabric, though.) When loking at the patterns in the priceless German disertation on the Kostümsammlung Hübsch by Johannes Pietsch, I realised this was done historically, too, with pieced garments. So in that context, you can totally shift grainlines away to your heart's content!

I sewed the bulk of the seams by machine because I was excited and wanted to finish this bodice faster than my previous historical makes (four years is a rather excessive precedent and is stretching one's patience, once the undergarments are already done). Then I got the bright idea to fell stitch / whipstitch (?) the seam allowances down, which turned out to be not very brilliant actually because it resulted in ridges on the outside (thick upholstery fabric). But I kept it that way while I was ahead...

The lacing eyelets were rather a pain. The thick upholstery fabric was so hard to make proper awl holes in! And deciding to use buttonhole silk twist didn't help - it's bulkier. Though also neater, even if mine turned out to be lighter in colour than the fabric.


Thankfully, I decided to lace it with a cord I knitted myself out of cotton crochet yarn, with two stitches only (just like lucet, without a lucet), which is thin enough to pass through the resulting tiny eyelets (a large blunt needle in place of a bodkin helps, though, although it also passes through with more difficulty).


I spaced the eyelets as suitable for spiral lacing - although looking at Comtesse de Bonneval, I clearly could have gone with a regular criss-cross placement; I somehow forgot that part. (I need to work on keeping my inspiration images and sources before me throughout the process of working on things because that sort of thing happens to me far too often.)

I made a thread bar on the inside at the top edge, also from my buttonhole silk, to tie one end of the lace to. The bottom end of the lace I originally usually led back up underneath and tied to the thread bar again as well. When I had a not-lacing-tight kind of day (like when I wore this over a modern bra to church...), I just tied that end off at the bottom. Then that became the norm because my bust had grown about 6 cm since I first made the bodice... and now I've lost some cms there again, though not the full 6. But that's the flexibility of lacing for you! :-)
 
Originally, I only finished all the edges with piping. I don't even think it’s historically correct for the period anymore (maybe it's only an 1810s-onward thing?); and in either case, the folly of using an ahistorical thick upholstery fabric this way became apparent
soon: the fabric ripped / unravelled in several places at the edges in the first wash, before I even had pictures taken. (All the photos in this post were taken during the restorative process or afterwards, I have zero pictures of it in the only-piping state...)

ETA: The problem is that, in order to turn the seam allowances around the curves, I had to cut them quite narrow and - well, the thick fabric is simply not suited to that sort of treatment, together with the thick turn of cloth it puts too much strain on it, and the fact it's a satin (= a somewhat looser weave) did not help...
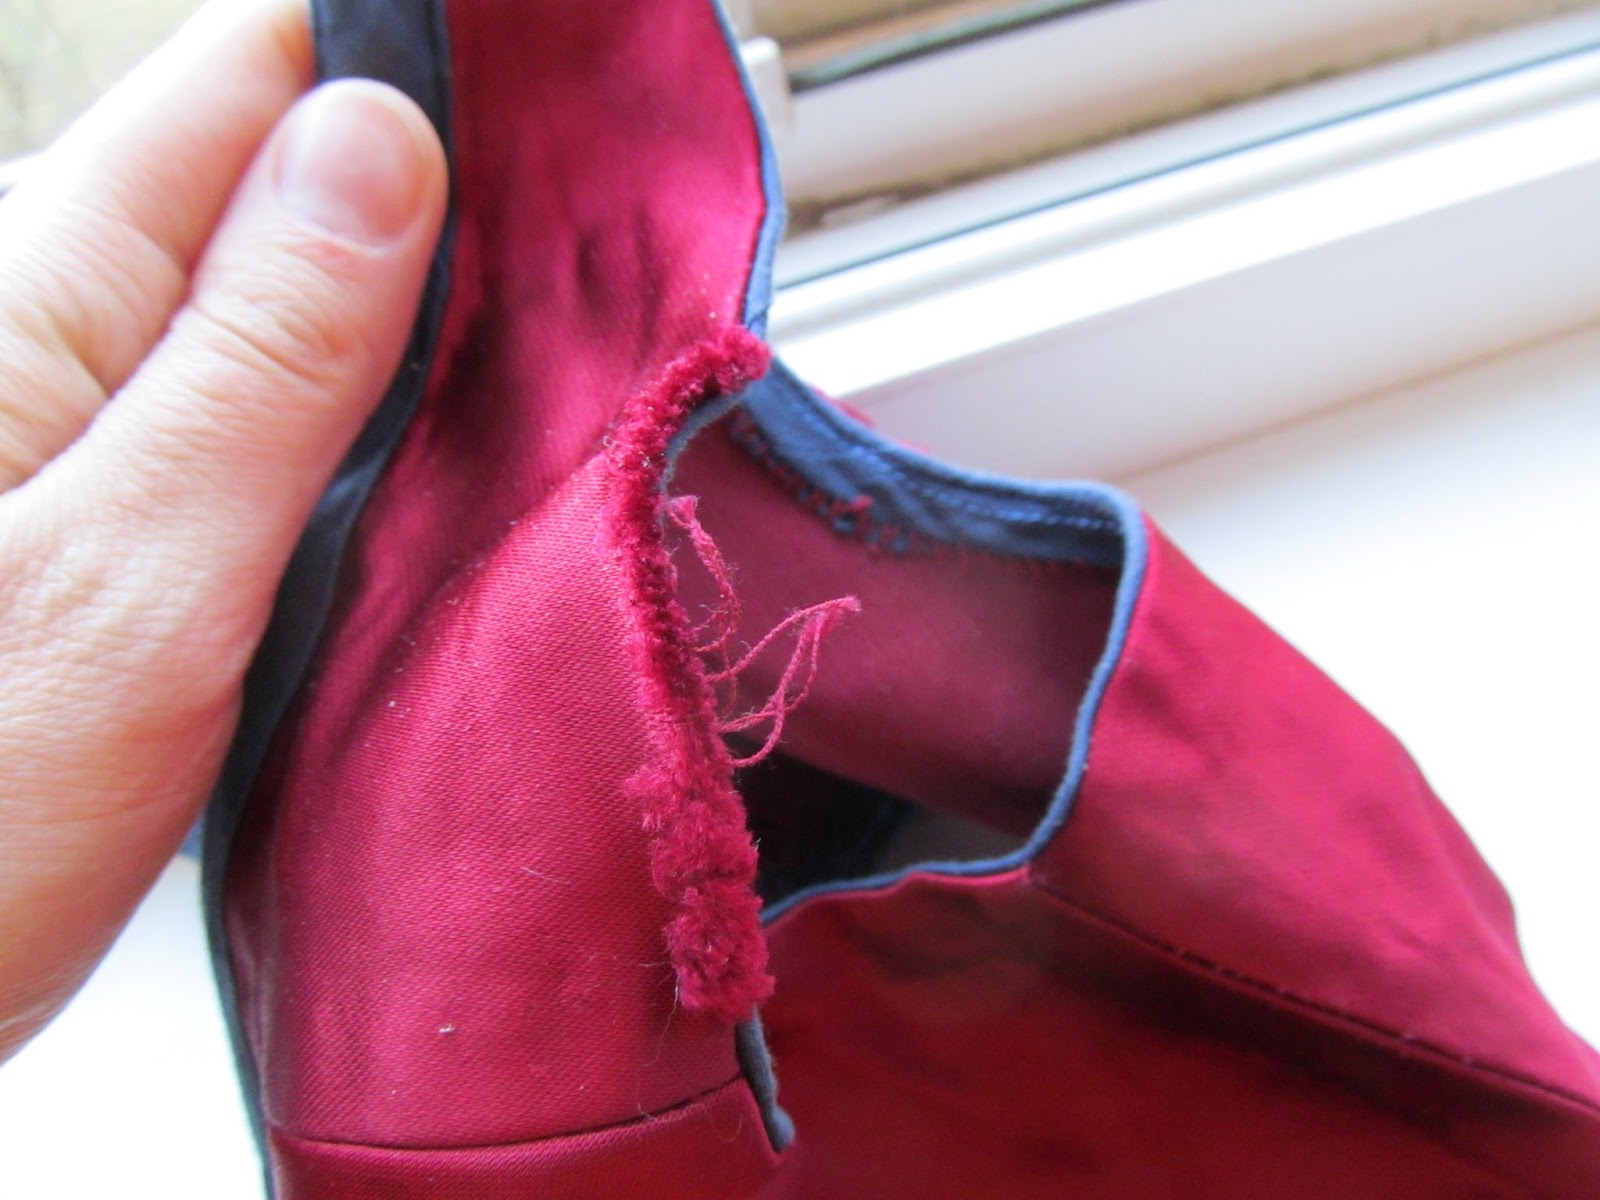
 
I was grumpy about it for a bit, because it ruined the clean look I was going for, but then I caved in and added more trim to save it / cover it up: bias strips whip-stitched (fell-stitched?) to the piping & stitched down with backstitch on the other side, and bias binding at the lacing holes in the front.

So that's the whole of the lesson of not using historically accurate fabric and historically accurate techniques. :P

(More historically accurate fabrics would also likely result in the historically accurate wrinkles one can see in the portraits...) 

ETA: Notice that the bottom edge, which isn't so curvy, survived my piping treatment unscathed, presumably because I did not cut the seam allowance as closely as I did around the curves and the lacing holes at the front openening.


Anyway. Despite the problems, I'm happy with it. I'm particularly happy with the basic shape of the pattern, because that looks exactly the way I wanted it to look. It looks so good I could not believe it when I first saw myself in the mirror and later photos... It sits just like the bodices from the portraits. It's a very satisfying experience to get that result without the jumping board of a pattern taken from an extant garment, with something you just kind of eyeballed.

This is a photo by Páv Lučištník, so far the only good one I have of myself in full Regency getup... my tendency to forget to put on jewellery strikes often! :D So does my "RBF"; for some reason the photos of myself from the events that I know of always make me look bored even when I know I was anything but! Here I was looking at the people dancing and apparently previously tried to take some photos of my own. It's back from the bodice's first outing in its altered state in February 2017. I think I need to revive that headdress style...

So I'm totally going to one day make another one in similarly rather inaccurate cotton velvet, with hopefully more accurate construction techniques. I was originally thinking of a blue velvet remnant, but now there's the Purple HSM challenge and I thought back to the purple velvet... and there's Vanessa's oh-so-pretty printed cotton one... aaand I have some thrifted silk garments intended for repurposing as accessories... so, considering how easy it is to make this garment out of remnants, I suspect I'll eventually end up with a wide choice of sleeveless spencers to spice up my Regency ensembles. :D

I also want to eventually share the pattern (because it turned out so well!), but this post has been in limbo long enough and I don't want to keep waiting till I finish digitising the pattern... especially because it occurred to me that with how simple it is, it may be a good training ground for improving my grading skills...


Just the facts, ma'am:

What the item is: “Regency” bodice / sleeveless spencer
The Challenge, and how this item fulfils it: HSM '17 #2: Re-Make, Re-Use, Re-Fashion. I used trim to save / cover up fabric damage.
Fabric/Materials: Marked down remnant of red cotton upholstery-weight satin (NOT recommended, with emphasis!); navy blue lightweight cotton sateen for trim (pretty great!)
Pattern: My own, an evolution of my wrap stays / brassiere.

Year: c. 1800
Notions: red thread (polyester, I believe), dark blue cotton thread; red buttonhole twist for the lacing eyelets & a thread bar on the inside which I tie the lacing to; dark blue cotton crochet yarn knitted into a lacing cord; thin linen cord for the piping.
How historically accurate is it? Meh. Fabric is wrong, some of the methods are wrong (it’s even partially machine-sewn). On the other hand, the shape is pretty spot on on me, so that’s a plus. Also, the Re-Make part is pretty good: using trim to cover up damage is a valid thing, bias strips as trim are valid as far as I know, and the handsewing stitches I used (backstitch & fell stitch) are valid.
Hours to complete: No idea whatsoever. Sewing down the trim at one armhole (cca 52 cm) took about 1,5 h, I think?
First worn: In the original state, for the first and the last time to a production of King’s Speech by the National Theatre in Brno (an occasion that seemed to call for an evening dress, so I used the best I had :D). In this new iteration, to the “All in the Garden Green” ball held by Jane Austen CZ on February 25 2017 in Brno-Tuřany. And then many times afterwards, not all of them historical occasions, either.
Total cost: Low. I don’t remember how much any of the materials cost anymore, but in any case, the red fabric was marked down and I only used about half of it, the blue was cheap to begin with and I only used a bit of it, and there wasn’t much thread or yarn used, either. All in all, I’m guessing about 70 CZK ( = less than 3 USD)? The cost would go up if I did it more correctly and used a thinner, historically accurate fashion fabric coupled up with a linen/cotton lining.

Monday, 3 August 2015

Heritage sneak peak

The original idea was a Moravian Wallachian folk costume shirt that could double as a Regency shirt and would involve this so far rather wonky embroidery...


... but seeing how long that's no doubt going to take and that I have other priorities than to spend the month of August embroidering, it got relegated to slow progress and the Silver Screen challenge (I do have a way to make it fit that, honestly).

The green stitches are me finally trying out the various stitches in the book on folk costume embroidery I bought years ago. The diagrams are rather confusing, but I think I've finally figured most of them out.
One of the things learned: Detached buttonhole stitch is called "stínek" in Czech; it's also the name for this, as it's used to connect two pieces of fabric. Based on that and a picture in the book, I'm assuming the name applies to the stitch because it was also used to connect two pieces of fabric.

* * *

What I turned to for this month is, instead, a Moravian Wallachian folk costume bodice.
Which will carry on to the later Sewing Secrets challenge with the addition of detachable sleeves to be turned into an approx. 1790s jacket/spencer (exact method of attachment to be determined). No, I don't think it's entirely accurate, but it's close enough and it works for me! If I'll be attending more of the Regency events, I'll need a spencer sooner or later, so why not kill two birds with one stone?


The pattern was derived from the kacabajka pattern, because I really do like killing two birds with one stone and using what I already have.

The fabric used to be a thrifted coat. It's only 80% wool, but how often would I find quite a lot of historically passable red wool fabric only for 50 CZK? I squeezed the whole of the body from the raglan sleeves. The new, curved sleeves will have to be cut from the body of the coat. Ah, the paradoxes of repurposing!

Friday, 14 February 2014

HSF '14 #1: Make Do and Mend & #2: Innovations - Dark blue coat refashion

I'm sooo late with this. It was actually meant to be the first challange, Make Do and Mend, because that's mostly what this is, a refashion. But, basically, instead of adding the finishing touches and taking photos, I kept just wearing it. It's so precious and useful.

The photos I've finally got are nothing special. It is, father remarked, the worst possible weather for photography. It's lovely to be outside - it's practically spring weather - but the low sun, shining so brightly, makes for - well, see for yourself:


Contrast! Whole areas of face washed out in light!
(Also, I honestly have no idea why the photo looks so red. It doesn't when I view it on its own!)

This coat started life as a coat I got for free on a clothes exchange, and it looked like this:


It maybe does not look like that much of a difference on the photo, but the difference is huge. It was about four sizes too big. Single-breasted. I've turned it into sort of double-breasted, by moving the buttons: that took care of the width. Length was eventually taken care of by chopping off about 8 cm from the shoulders and collar (in the back). I also narrowed the sleeves. I also took it in a little bit in the back around the shoulders.

That was the first level, which I already did last year - this coat's first outing was when I went to the National Theatre. And on that outing, with my Little Black Dress underneath, and a fierce wind blowing, I realised I needed another layer in the back and in the sleeves to keep warm in similar weather. So that was the second level.

For the back, I used the back of one of my medieval muslins, which started out as an old sheet... more Make Do!


I turned and stitched down the edges - I did not bother changing the thread, so you can see easily - and then just tacked that to the back of the coat (with the lining removed from the top part of the coat for the process, of course).
I already had a pattern for the sleeves from resizing them, so I used that to make an interlining layer from another old sheet. I whipstitched those inside the sleeves.


So that's for the Make Do part.


The innovation part is this:


And it's what I'm so excited to share! (Even though I'm excited about the coat itself, too. It's a wonderful soft wool, in my colour, in my style, fun to wear, warm to wear, it's got pocketses, perfect.)

It became apparent, in the resizing process (and actually even before it, from the state of their attachment), that the three buttons were hardly enough to carry the whole weight of this gloriously long woolen coat. So I added press studs / snaps in between them, and one on the inside of the "double-breasted", too, for that to hold in place better.


So yes, press studs / snaps. (Thank you very much to Ricky for clarifying the use of the terms below.) They are an important innovation in the clothes-making and clothes-wearing area. Infinitely more important for people like me who are not fond of buttons. (I like fabric-covered buttons, so I'm fine with those on this coat.) And they make everything easier for everyone, children in particular.

Apparently, press studs / snap fasteners of some kind were invented in the second half of the 19th century, and for the reasons above and more, they became quite popular. Most sewists today probably know from experience that they make for more discreet fasteners, too, sometimes.
But it wasn't until 1903 when a Czech inventor named Hynek Puc, in a company of a certain Mr Waldes in Prague, invented a machine that made putting press studs / snap fasteners together much faster and easier - and much more economically feasible, too. These new ones were named Koh-i-noor, became even more wildly popular worldwide, and they are produced and sold under this name to this day. (You can read more about it in the link.)


So you can imagine how tickled I was to be able to use a Czech innovation for this challenge!

Obviously, because my coat is just a refashioned modern coat, the historical accuracy is rather hazy. I was aiming for a vaguely 1930s style (I like my beige cloche), and I think the style is there, because my friend's mother remarked on it, without me saying it first, when I wore it to church on Christmas (turns out she used to have a very similar coat that had belonged to her grandma). :-)
But it's longer then the 1930s coats I've seen. I liked the length, too (it's very useful for when I wear shorter skirts in winter!), so it's actually stylistically closer to the actual era of the invention, I think.


I wanted to take another of those photos with a cat, but the cat had other ideas for what to do with her time. I tried to hold her the whole time the self-timer was preparing, and then she slipped away from my arms and ran away just as the photo was being taken.

Aah, I can't get over how wonderfully snuggly this coat is.


Just the facts, ma'am:

The Challenge: # 1 Make Do and Mend & # 2 Innovation
The innovation: Koh-i-noor press studs / snap fasteners

Fabric: A 100% woolen coat (with modern polyester lining) + old cotton sheets for the interlining layer
Pattern: none
Year: Let's say 1905-ish and/or 1930s-ish
Notions: Black thread, Koh-i-noor press studs / snap fasteners, a piece of anachronistic but needed fusible interfacing for a spot in the collar where the original interfacing was damaged
How historically accurate is it? Not much, because it's a refashion of a modern coat, including fusible interfacing. But most of the things I did to it are historically plausible, I think; and the innovation I used definitely is.
Hours to complete: I've worked on it on and off for over a year, so I truly have no idea whatsoever
First worn: Um... let's say today?
Total cost: This is another of my favourite things about it - coat was free, interlining and fasteners were ancient stash, so all it cost was a bit of thread and a bit of interfacing: somewhere in the area of singles or tens of crowns. Not bad at all for a 100% woolen coat that's perfect for me! :D

Thursday, 12 September 2013

Thrifted dress re-sewed. Sleeve cap ease is still bogus. Shoes again.

Long time no see!

There has been much less sewing than I'd wanted to, which I think was to be expected, what with my laziness, and the trips we did with my sister in summer, and translation work, and watching things, and laziness... :D

The good news is, I've got loads of photos of beautiful places around the Czech Republic (mostly Moravia) to show you, and I should start with the chateau in Bučovice that I owe you since 2011, but before I do that, I want to show you my latest thrift shop find, or rather parts of it because it's too cold outside to wear a dress, lest you forget this is a dress diaries.
It's a Boden dress - I determined it is Aqua Bud in crinkle cotton (not available anymore). Or was. It said to twist after washing to retain the crinkliness, but I did not like the sort of crinkliness it had retained - more like sticking out in all directions. So I did not twist it after washing and instead ironed it smooth.
And re-sewed the sleeves and sewed the surplice together. I settle on the conclusion that custom fit rules, particularly if you're not a B cup, and sleeve cap ease is still bogus (my, do I love that eye-opening article!). The original shape of the sleeve was practically the same in front and back. Maybe even more cut-out in the front. Huh. (Come to think of it now, maybe the dress had wrongly inserted sleeves to begin with?)


Compared to my Lisbeth sleeve - oh, did I mention I started calling the LBD pattern Lisbeth? :D - it's rather obvious that the easing does not exactly help with what is simply a wrong shape. I had to wriggle the Lisbeth pattern around a bit to make it fit into the present armhole, and the results are not perfect because I had a limited amount of fabric to work with and a not-quite fitting dress to start with, but it's somewhat better.
Oh, and I think it is worth mentioning that the (original) Lisbeth sleeve actually fits into a smaller armhole than the eased sleeve did, and is still more comfortable and easier to move in. So much for the ease of sleeve cap ease, yeah. Not all sleeve caps are created equal.
(I suppose there are some eased sleeve caps that are well-fitted and easy to move in; but this was definitely not one of them.)

The dress is still not a perfect fit - it's actually a size smaller than I should have according to their size charts, and I suspect the bust and sleeves might have been better in a larger size, but then it might be way too tent-like anywhere else. But passing a cotton dress in your style, in your length, in your colours, for 20 CZK - that is hard. :D (I think I actually remember having admired that dress online, way back when. So, yay!)

* * *

And American Duchess is doing yet another giveaway, so here is an obligatory share of the new 1930s-style Claremont Oxfords.
Is she ever going to make shoes I do not want?! I still do not have any. It's always been a bit too much money that could and had to go elsewhere, so far...

Sunday, 18 November 2012

The buttons my grandfather made

My grandfather is a dental technician. Don't freak out just yet; it means he had always had easy access to resins.
That means he could make these:


Resin and ink shank buttons he made for my mom years and years ago. I don't understand the details of working with resin, but it basically sounds like something very easy (if you know how to work with resin) with very impressive results.

They were originally not attached to this bright blue jacket. The buttons that came with it looked like this:

It looked worse in real life than it does on the photo. This very bright, very blue jacket was fitted with greenish-greyish blue buttons; a very wrong colour that made it look shabby, while it is actually so bright and shiny and cool.

I pronounce my grandfather's buttons a big improvement.


(Bright and shiny and cool against a very shabby backdrop.)

Monday, 8 October 2012

I've sewed, too

I finished part of the blouse part of my sister's dancing costume (which, it turned out, she really wanted to be the tunic part of a salwar kameez, for increased universality, so that's what it became); but I don't have photographic evidence, which is waiting for when it's all finished. I still have to make the vest part to fulfill my birthday gift promise to her, but since she left the tunic in Brno and I cannot muslin over it now, it will happen later.

The "photographic evidence" part will be a bit impaired now, because Autumn means rain and clouds and dark comes early, and that means less photographing opportunities - it's nearly impossible to take good photographs in our house, even more so when it's cloudy and dark outside, and impossible to take photographs outside when it's raining, so the only place left is the flat in Brno.

Now, I'm remaking RTW - in the completely-rip-apart-and-sew-into-something-else sense: a 75% wool - 25% nylon skirt that I got for 10 CZK in a thrift shop and wore only once because it soon became too tight for me. Re-sewing it into a (modern-day) spencer, which does not exactly go with the spirit of the challenge; it's frosting in Marmotaland. (And of course it's grande-assietted.) But since Marmota's idea of frosting is a bit closer to someone else's idea of cake, I don't feel too ashamed about it; I'm using up stash, too. I'll probably have to piece like mad in some places to squeeze it out of the fabric I have (the main reason why it's frosting and not cake: a spencer and not a full-blown jacket). But it's still a very lucky project, which will hopefully hold until it's finished.

Lucky as in, I got wonderful mostly wool fabric for the very, very ridiculous price of 10 CZK, lining plus spare invisible zipper included, and already have the perfect buttons in my stash (and should already have violet buttonhole silk, too, though I cannot locate it right now).


Lucky as in, rather flu-dazed Marmota pieced without thinking and still managed to match the plaid.


Lucky as in, this fabric is an absolute delight to sew with, and makes me wonder what an even greater delight it would be to sew with a 100% wool fabric of a similar kind.

Saturday, 21 April 2012

A Little Black Dress in practice

So, here's a photoshoot! The Little Black Dress, as I wore it to the wedding today.

(I'll probably also do some photos of details, later.)

 The jacket is about 40 years old; one of the things I got from my friend's mother, together with the Alice Stuart blouse. It came with ugly, non-matching and awfully attached buttons. I switched them for these blue-and-white ones my grandfather had made (with resin and ink); when I was a child, my mom had them on a dressing gown, and I've always loved them in the stash and wanted to find a worthy use for them. I think I did.
 (The jacket still needs to be taken in a little bit in the back for me, but otherwise it's a perfect match for the dress!)

 Necklace from my grandmother and my favourite thrifted shoes.
And a very nifty (alas, very small) purse that can go from shoulderbag to clutch.

And the Madeline hat, with many thanks to Lisa. It has really turned out to be just the hat for me; I think you'll be happy to hear I got compliments on it, Lisa. :-)

And many thanks to my sister for the photos, and for help with the dress - she marked the back neckline for me, and the perfect skirt length as well.

As we were dressing up and my sister admired my 50s inspired outfit and I admired her Indian violets (I took a photo of her, too, but it sadly did not turn out well - I'm not used to photographing people...), we got the scary idea that we might upstage the bride.

We needn't worry.

She comes from Algeria; she was so nicely put together in her Algerian outfit that no one could outshine her, not even the medieval-clad guests from Germany. :-)

Wednesday, 15 February 2012

Refashioning, Alabama style


It's the style of Alabama Studio and Natalie Chanin, but I am only obliged for it to Anna of Pleasant View Schoolhouse.

My design placement is much more random than theirs. It's because I'm trying to cover stains on the T-shirt. There will be much more of the appliques; right now, it's on a slightly weird spot - because the stains were on a slightly weird spot.

I'm using motifs from a border pattern I found years ago on Nedlecrafter.com, and some I am inventing myself as I go. I hope the end result will look fine...

Thursday, 30 June 2011

It's cherry time!


Tuesday's outfit:

T-shirt - H&M, thrifted
Skirt - made by me from a pass-me-down dress (cut off the bodice, sew an elastic chanel, insert elastic)
Headband - made by me
Necklace - made by me (see below)
Bracelet - most probably a gift from my cousins (see below)
Belt - found at home (no one has worn it since I was born, as far as I can tell)

Ours are actually tart cherries, so they'll get even darker and I'm just posing, not picking them.
The outfit resembles more the sweet cherries we used to have when I was a child. Then the tree died. Later on, we got this tart cherry one. That one's going strong, stronger with every year. Want cherries?
(Well, sending cherries overseas would not be a good idea. Sorry.)


I used up most of my red wooden beads for the necklace. Some of them are old, some of them (the shaped ones) are bought new about a year ago. I was afraid I would not have enough of them and that it would end up with a weird length, but it turned out just about perfect. Including the number of beads (the design took some counting).

The bracelet is simply wooden beads on an elastic. I think I got it from my cousins several years ago (that's why I can't remember for sure). I've always liked it, but never knew what to wear it with - until now.

Saturday, 4 September 2010

My Blueberry skirt


Today I wore, and plan to wear tomorrow to the church:
- the usual headscarf
- a thrifted 7/8 sleeve blue T-shirt
- a Vandenberg T-shirt underneath for additional warmth (although it turned out not to be necessary; but at least it sort of compliments the colour of the shoes)
- a beige sweater from a clothes exchange
- my Blueberry skirt (details below)
- striped blue above-knee stockings (or whatever it's called) from a shop in Brno
- thrifted modern shoes with vintage appeal (a different pair from the one that did not fit me - these fit just right), my new favourite pair; but apparently, even with the grass cut, you can't see much of my shoes in these garden shots
- a slip underneath the skirt which you naturally cannot see (that's the point!)


It was my favourite skirt. It was the perfect length and shape for me (A-line, just under the knee). It had a fun flounce/ruffle on the bottom. It was made of corduroy. And to top it off, it was thrifted and I got it from my mom, it was one of her lucky finds for me (she's had at least three other perfect lucky blind buys for me that I can remember from the top of my head).

And just when it was the only thing I had with me to wear to a January wedding, it got burnt by an old iron with a faulty thermostat. I did wear it to the wedding (fortunatelly it was a very intimate event where all the focus was really on the couple getting married and not whatever I wore), but it was the last time for a long time.

It was lingering in my stash of things to remake and salvage for about a year, I think. I thought of applique. But with the flounce, I feared an applique would turn it into something blindingly silly-girly. The flounce was in my comfort zone in that aspect, but what kind of applique could it be not to make it into some kind of misguided poodle skirt? Everything I thought of seemed to be teetering too close to the edge.

Then I found this and I knew that was it. Of course, I did it my way. Among other things, I did not have felt in this olive-green colour, so I went with blue felted wool instead (out of a thrifted skirt). That's the way with OutsaPop's blog. Most of the time, her style and the style she features is way out there for me, and way too edgy and dark-coloured and what-have-you... you know what I mean, don't you? I'm simply not the person to wear that style, not at all. But I can relate to her trashion values and from time to time, there's something simply fabulous. And a little of that kind of edge was exactly what this skirt needed. It's still cute, but not in a straight-into-your-face kind of way. At least I think so.


And the name? Even though I really love blueberries (if you at some point feel a need to buy my affections, a simple blueberry yoghurt or bluberry ice cream is very likely to do the job), I did not think of it when I made it. Then I wore it to church, and the minister remarked that it looked like blueberries. And that was the last bit to make this skirt my absolute favourite.

Happy Ending.