Showing posts with label Research. Show all posts

Friday, 27 October 2023

I think Victorian corsets are in fact still conical stays

Technically. At least some of them.

This is, sort of, a follow up on my last post, and sort of a follow up on an older one that preceded it. A while ago I posted about this 1840s corset from the Met Museum, and how, when I broke it down to pattern pieces and looked at the grainlines, it reminded me of J.S. Bernhardt's Fig. F pattern.

Corset, American or European, 1839-1841, silk. The Metropolitan Museum of Art, ID: C.I.38.23.10b-d

Well, now that I've looked at Bernhardt's book and not just Sabine's Short Stays Studies...

Nevermind Fig. F; look at Fig. B!


It has exactly the vertical seaming over the bust that certain mid-19th century corsets like the one above do. Also, hip gusset in the back.

Compare Fig. B to my rough draft of the Met corset:


Divide the back pieces of Fig. B differently - cut at the "i" hip gusset slit that's closer to the front and incorporate the gusset itself into the back piece (notice that that particular spot lies around the underarm line both in Bernhardt's draft and mine!) - and change the remaining tabs into a large hip-hugging gusset; raise it over the bust a bit... You've got yourself a mid-19th century corset!

Of course the pattern pieces are tilted slightly differently in my rough draft, because I wasn't drafting it on a conical plane. And in fact, I think the grainlines are the main difference between Bernhardt and the later corset - Bernhardt, or at least Sabine according to him, lays it out with the centre back on the grain and everything else fanning out from there, with the centre front almost on true bias. The 1840s corset also has the centre back on grain, but the tilt of centre front is more akin to its tilt on the draft itself, as if you left the draft as is and just rotated the back pieces so that they are on grain... 

On the other hand, though, if we consider Bernhardt-style stays as a precursor, it suddenly makes a lot of sense why a lot of Victorian corsets cut the side pieces tilted, on bias! Which otherwise comes rather out of nowhere if you're instead looking at them as a direct descendant of straight-cut Regency stays.


Fairly randomly chosen 1878 US corset patent from haabet.dk


All in all, it's fairly clear to me that if I started out with a conical block a la Bernhardt, it would actually be way easier to get exactly the results I need for this particular style - I would have far less counter-intuitive places to do subtracting of empty spaces in. The conical draft already wraps around the body the way you want it to and accounts for its non-rectangular nature; you just cut it up into sections where you need to and take it in so that it really hugs the body and supports the bust. Does that make sense?

Like so:


It's a quick and dirty draft and I forgot a couple things, like taking it in in the back. But you get the idea. One day I'll do it properly; it's pretty clear to me now that I will have to. :D

A teeny tiny detail, but even the fact the hip gusset is cut on bias now falls into place for me - it seems many late 18th century stays cut them that way.

Ergo: Victorian corsets are still conical stays!


But that's not all! There's another fun image to support my working theory!

The working theory is that professional staymakers continued cutting things the way they knew, and just kept gradually updating the styles. That the straight-cut gussetted columnal stays we think of as Regency stays, that we think of as the direct precursor to Victorian corsets, are, in fact... well, not an evolutionary dead end, I think they may well have contributed something. But it seems to me it makes a lot more sense if they contributed less than we think. I think that the picture will be more complete if we think of it as Victorian corsets having at least two ancestors, not just one. That all the experimentation of the long Regency era resulted in the subsequent designs picking up features from all over the place.

Which brings me to the aforementioned another image. This is a detail from a satirical print from 1823:

"Painting"´, William Heath, 1823. Lewis Walpole Library, Yale University.

Well, if that doesn't look a lot like what we consider to be 1790s transitional stays. In the 1820s! (And the picture can't be much older than its publishing date, what with her hairstyle, puffy chemise sleeves, and the dress to the left of her that I cut out from my selective image.)

I see two not immediately striking but I think very important differences in the image, compared to "transitional stays" like these:

Corset, 18th century, Met Museum, ID: C.I.41.94

One, the pronounced curve of her busk - really quite similar to the 1840s corset, especially in how it curves over the stomach instead of the more or less straight belly line of 18th century stays.

Two, the fact the bust cups do not look gathered but smooth.

Somewhat like these:


Corset/stays, dated to 1820s-1840s, Glasgow Museums, ID: E.1948.31.a

 I am currently aware of three 19th century corsets / stays with smooth cups of this sort - the Glasgow example above stands out among them by having seamed cups (really they seem quite similar to a modern bra), likely to accommodate a larger bust. Three still isn't much, but it already is more than the one I knew of years ago, and goes to show that this was, in fact, a Thing. The third one is in the Czech National Museum, was featured in Stays, or a Corset?, and unfortunately has no online presence that I know of. It also has fully corded cups, in a diagonal pattern that I am tempted to say I am seeing in the Heath print, but I think what's actually happening in the print is simply shading.

The three extants are all, more or less, stays of the columnal style, so seeing it done on the conical plane in this picture is super-interesting. And it supports my theory that there was a lot of experimentation and variety going on in the first half of the 19th century, the styles were by no means set in stone, and they did not necessarily conform to our modern ideas of what was happening when.

A pattern for the stays in the print could basically be achieved by combining Bernhardt's Fig. B/Fig. D with the bust cutouts of his Fig. C - although, based on comparison to the pattern draft of the stays from the Czech National Museum, you should probably make the cutouts a bit narrower and deeper - there needs to be a busk in the centre front going all the way up, and since there are bust cups in the cutouts, the bottom should likely reach the bottom of the gusset slit:


So, yeah. This patchwork of styles apparently existed. Or at least likely existed - we still have to keep in mind it's a satirical print. But since the stays don't seem to be being satirised and therefore don't seem overly exaggerated, and they show quite a lot of detail that actually makes sense in the larger context of early 19th century corsetry, I think the likelihood of them being a complete fabrication is low. Tabs in 1823 are a bit surprising, but the bust cups are not, and thirteen years earlier Bernhardt did include tabbed drafts in his book and apparently said one could and should mix and match according to taste. So... there definitely is more to corsetry of the first half of the 19th century than we used to think.

It makes a lot of sense to me that, as there began to be more emphasis on the natural waistline again, at least some staymakers simply returned to cutting stays the way that worked for that. They just added the experience gained from Regency styles to it - such as a greater reliance just on the cut of the fabric for bust support, as opposed to fully boning the stays and/or packing them with strength layers. And using gussets in more places than just the back hip.
Throughout the long Regency period there had been old-fashioned ladies who still preferred the old smooth cut of stays over the bust gussets (Bernhardt also mentions as much in 1810). And people in more remote, rural areas had not made the switch so swiftly - sometimes never. (Czech folklore collectors noted / recorded that fashions could take up to about twenty or twenty-five years - basically a generation - to filter down to regional dress more remote from urban centres at that point in history, and that's just talking about the elements of fashion that did filter down into it.)
The period of raised waistlines was not so long that all the old staymakers would have died out and taken their knowledge to the grave. It's not a breach and a complete change, it's a gradual evolution.

It actually possibly continues all the way to the Edwardian era, when we once again get an openly conical design with the "Corset Radical" that I did a Deciphering post on years ago:


Corset "Radical", Federer & Piesen, Prague, c. 1905. The Museum of Decorative Arts Prague, ID: 104484

One of the joys of my nerdy existence is that someone has actually made a corset like that since then!


Now that I have the idea of a basic conical block to compare it to, this design makes even more sense. I wonder how exactly A. P. McGraw (or Federer & Piesen?) arrived at it? Even if it was not through a conical block, I think my ideas of creating one could easily be applied to it...

More on those ideas later, I hope.


Monday, 17 February 2020

Deciphering Historical Clothes: A c. 1840 corset & Drafting a pattern from photos

I've been stuck at home with a flu for over a week. After the first couple of days when I really felt awful, I now feel mostly okay except for a bit of a cough, a bit of a temperature and the fact any sort of physical activity tires me very quickly.
So I'm stuck mostly sitting down and trying to invent ways not to go crazy with boredom and do something more productive at least with my mind.

Which in Marmotaland sooner or later means DECIPHERING HISTORICAL CLOTHES.

I have corsetry on my mind, what with deciding that I need to make myself new Regency stays (my size has changed so much that I eventually figured out altering my old ones was probably more trouble than it was worth, alas). Along the line, I got to wondering about some 1830s-1840s corsets without bust gussets (I always have the 1840s low-key in my mind because the discontinued kacabajka adventures hang over me), and that led me to this c. 1840 corset in the Met.


Atelier Nostalgia (who has recreated it and whose blog post directed my attention back to this particular one) noted that it has no bust gussets. Which she says was unusual but I think it was actually quite common at that particular point in time and soon ceased to be so for some unknown reason - plenty of the c. 1830s corsets are simple "princess seamed" affairs. She also noted that the museum helpfully provided lots of detailed photos.

Those photos are, of course, ideal for deciphering.

Behold my usual messy colour-coded pictures:


Blue is for seamlines between pattern pieces.
Purple is for boning and the front busk.
Red is for the very narrow boning channels which may involve narrow baleen (is it possible to make baleen so narow? I have no idea), or cording, or even reed - which you can totally still use in Victorian corsets! To which this 1863 patent by Lavinia H. Foy attests with this sentence: "Rattan and whalebone strips can be inserted in the usual manner..."
Green is for grainlines. Sorry for making it so pale; I didn't want to cover the details underneath too much with all my scribblings, and went a bit overboard on the transparency. It should be easier to see in the full size. (What's not accounted for in my pictures and what I did eventually figure out is that the front hip gusset is also cut on bias. I am still not entirely sure about the back gusset but I think it might be on straight of grain.)

The corset is made from satin, which is a beast for determining grainlines even in real life, let alone in photos. Luckily, some of the photos are VERY detailed, allowing me to make a better guess, especially because in some places the fabric is a bit worn, which exposes the yarns more and makes it less of a quesswork. Also the lining (see additional photos at the museum site) is plainweave, which also helps; although I think the lining doesn't quite match the outer, it does more or less correspond to it.


What struck me was that the centre front was not cut on straight of grain, and neither was the side piece - leading my train of thought straight back to my Regency stays enterprise and the Bernhardt stays, specifically Fig. F.


There are definite similarities between this corset and the Bernhardt stays when you look closely (aside from the aforementioned, the hip flare is basically just an addition to bring the corset lower down the hips). That got me so excited about this corset as a possible sort of missing link between Regency and Victorian styles that I went ahead and roughly drafted out the pattern for myself in Inkscape, more or less following the principles lined out in Cathy Hay's Corset Making Revolution article. (ETA Nov 2020: Sorry, that's no longer available. The Foundations Revealed website has changed the way it works and there are no free articles now.)

And it worked.

Well, obviously I haven't made a mock-up yet. But my experiment did yield a pattern that looks like a good starting point for that. It's also similar to this possibly early 1850s corset on the Abiti Antichi site (which still has shoulder straps and on the other hand seems to have some sort of proto-opening-busk), so it's probably a very good basic style for the 1840s mid-19th century.


But more than that, as Atelier Nostalgia also noted, it's also a style that you can find it later corsets as well. And not just the 1850s. It looks surprisingly similar in principle to a couple corset patterns in patents from the 1860s and 1870s on the Haabet site.


And, from my browsing of museum collections, it also looks like a style that, with slight variations, carried all the way to the 1880s. Most 1880s corsets tend to have wider fronts, though, and are usually more along the lines of the gussetted or princess-line corsets you can find in commercial patterns. But you can still see elements of this sort of construction even in some later corsets.


The difference being mostly the fact later corsets have opening front busks, cross-lacing, and tend not to go so low on the hips. Many of them also utilise bust gussets instead of the bust seams of this particular style.

All this basically means I've developed a method of drafting a certain kind of Victorian corset pattern that can work, with various alterations, for a period of about 50 years from the end of the 1830s to 1880s! It's different enough from the commercial patterns I'm aware of, and yet ubiquitous enough in museum collections that I think I really hit on something here.


This is what I eneded up with. It will still nead fine-tuning, especially in the underbust area, but it's definitely a workable start.
(The exclamation mark on the left means my division of the waist is imprecise because what I really needed was decimal point numbers and I couldn't do those quite so easily in Inkscape without changing the grid - which is a bother, so I'll get around to that in paper stage. Basically at this point there is zero waist reduction and I think there needs to be at least a little bit of it.
The exclamation mark at the front hip gusset means that particular seamline is in serious need of truing - and the hip gusset will need some slashing-and-squishing after I get around to altering the waist.)


In order not to make this post too long (more than it already is), winding and difficult to navigate, and in order to make it easier to make stuff linkable (I'm not flattering myself to think this will be linked, am I?), I will eventually put the whole drafting method for this particular style in a separate post, probably after I've had a chance to make a mock-up and really see how well it works. Although now that I have shared an actual flat pattern draft, I guess you could also just apply Cathy Hay's method to it without waiting for the next post. :D

And when I get around to physically drafting this pattern, I'll definitely do some sort of further pictorial comparison between it and the Bernhardt Fig. F to prove my point. It's not quite immediately obvious - especially because the distribution of seams is a bit different - and I don't think I'd have thought of it had I not been drafting the Regency stays just before. But that front dip, slight bias in the front and bias on the side (also just slight in the Bernhardt stays) did make me wonder. If you lengthened the two back pieces and the front tip of Fig. F, and introduced hip gussets, you would get something approaching the 1840 stays and all those subsequent styles!


What I will share here regarding the drafting is this: I knew, instinctively, that this drafting method might work because I've done it before with my first Regency stays. I looked at lots of photos of extants. Focused on seamlines and where they sit on the body. Drew myself some technical drawings. And drafted the thing in a grid following my own measurements in a method similar to what Cathy Hay does - except that I used a lot more measurements to make sure it really fitted me.

So yes, this can totally be done just from photos - as long as they are decent quality and you have more than just one view. Look where the seamlines sit on the body. Find the underarm line (3 in my plan below). Find the waistline (C) and underbust line (B - in this case it's a lower underbust). Figure out the grainlines. Go from there.


In this particular case, I was lucky because the museum even provided a flat photo, so I could use that as my rough starting point for a flat plan (and use some common sense to account for the distortion).

If you don't have a flat photo - I didn't for my Regency stays, both because there aren't that many online in the first place and because the stays were an amalgam of many individual garments - draw yourself a sort of gridded flat plan first, not bothering with exact measurements for now. Make several such plans if it helps you to make sure you understand how it goes together.

And then you fine-tune that plan with actual measurements. Make your default horizontal lines the length of the biggest measurement of the main pattern pieces (excluding gussets), minus your preferred lacing gap, and go from there, leaving gaps where your other horizontal measurements are smaller. Or (like Cathy Hay) go with the bust, overlapping your pattern pieces in places where you're bigger (hips).

Meaning that for this particular corset - with its bust seams - I went with the bust measurement for my horizontal lines (and added the gussets for my hip / upper hip measurement, which is slightly bigger than my bust). For my Regency stays, I went with the underbust (because I was using both bust and hip gussets and really needed them to fit snugly at the underbust).

If you're drawing on paper, it may help to start with a scaled down pattern (in pencil!) to see at one glance if you're really going in the right direction. Your scaled down first draft can also double as a draft for your boning layout. (Or do it like I did now and draft your pattern in a grid in Inkscape or similar vector graphics program - that has the advantage of allowing you to correct mistakes cleanly, including the "back" function.)
That draft is your first dry run. It will help you catch any mistakes and things you forgot to take into account before you draft full-scale on paper. (There will totally be mistakes and things you forgot to take into account. On my first run through this pattern, I completely forgot to take into account the bust-to-waist difference in the back, and the fact you want your corset to dip in the underarm area. Among other things.)

And even then, always make mock-ups. :-)


You could apply the method to other items of clothing as well, but what with them not sitting close to the body like a corset does, and involving things like pleats and gathers and sleeves, that will involve even more trial-and-error. But it can totally be done, as Sabine of Kleidung um 1800 and Bránn both demonstrate. Especially if you start with something simpler like an apron, and something in a patterned fabric like a check that makes it easier to determine pattern shapes.

So that's my five cents concerning drafting from photos. And 1840s corsets. Some people seem to think the 1840s are boring. I hope I've just proven they're far from that.

Sunday, 8 September 2019

HSM '19 Inspiration: #9 Everyday

The challenge theme for the Historical Sew Monthly in September is Everyday: It’s not all special occasion frocks. Make something that would have been worn or used for everyday.


Look at those divided mittens! Also, hoods, and split skirts probably for greater use of movement. That's about as far as I get, myself; if you do Middle Ages, I'm sure you'll gain more from this.

That's one challenge idea that's near and dear to my heart - over the years, I have discovered that even though I do fall in love with those pretty frocks (and there are some special ones I'm head over heels in love with), on the whole I prefer to treat my historical wardrobe much like my modern one: as a collection of separates that can be mixed and matched according to current needs, rather than as special occasion head-to-toe looks. I have great admiration for people who can pull those off, but this one is certainly a challenge for us who like our clothes plainer or don't feel up to that yet. :-) And maybe a relief from the big challenges for the others. Or maybe it's a greater challenge for you if you've only been making special occasion clothes so far! ;-)

Now you may ask, what is everyday clothing? And the answer is, it probably depends.

The conservation bias that particularly preserves special occasion frocks and special occasion looks usually makes all the genre paintings and photos and the occasional extant piece where you can see what people were really wearing on an everyday basis all the more exciting. But the scope of what that group of clothing and accessories contains is still large, depending on many factors like era, class, or region; and while it is tempting to go to the other extreme and look for poor people's clothing, it's not so black and white. Which is actually good, because you can still tailor this challenge to your own costuming (or even your own everday) needs!

Interestingly, the more recent it gets in the timeline of the HSM, the more differentiated clothes types can get, concerning conventions for occasions - until you reach the 19th and early 20th century with so many different types of clothes it gets confusing - what's the exact difference between an evening dress, a dinner dress, and a ball dress? And then tea dresses, and for men, things like lounge jackets get thrown into the mix. A ball dress is definitely special occasion, but might a dinner dress or a tea dress actually count as everyday? I'm tempted to say they're definitely special occasion, but who knows what they were like for different people!


Dinner dress, 1841–46, silk, American. Metropolitan Museum of Arts, ID:  1977.293.3
For a lady of somewhat limited means, this might be her best dress. For a more well-off one, this could be just one of several.

What for one class of people would be everyday might be special occasion clothes for another class - or what would be special occasion clothes in one era might be relegated to everyday in another; or vice versa. Clothes pass-me-downs were far more common in history than they are nowadays and a noble lady's everday stays may become a maid's best pair...

There is also the fascinating case of the (tree) bast shoes that medieval Czech kings would put on during their coronation - in rememberance of the legendary Prince Přemysl the Plowman who, of course, in his previous life as a plowman wore such shoes as a matter of course, just like other peasants all the way to the 19th century.


1880s tree bast shoes - "lapti" - from Russia beyond the Ural. Národní muzeum, ID: H4-S3680. Felling trees just for costuming would be a bad idea, and there's probably a limited use for these in the costuming world. But it's a fascinating historical tidbit.

Of course, one can always use more chemises or shirts for one’s everyday wear. Undergarments – given they do not scream “fancy” or “for a special occasion” – are certainly something that would have been worn every day.

Man's shirt, linen or cotton, Dolní Němčí, Uherskobrodské Dolňácko, Czechia, early 20th century. Národní ústav lidové kultury, ID: 5351, Accession Number: 5051/1983.
(The date comes from this Esbirky listing.)
This shirt is yet another example of the blurred lines I am speaking of above: for the village man who would have been the original wearer, this was probably a special occasion shirt, as the lace on it indicates. But a pintucked shirt sewn along the exact same lines could have been a city man's everyday shirt in the late 19th and early 20th century. I share this particular example because NÚLK's online Badatelna, while somewhat clunky for searching, has listings for a number of these and other folk costume shirts with good quality flat photos that you can use for shirt construction research. (Search for "košile" and dig through the results.)

So this is all open to interpretation and if you can argue your case, we'll be only happy to grant it!
And therefore, for the rest of this post I'll just share more of my own favourite historical everyday items that I've stumbled on, and maybe some of it will spark an idea if you don't have one yet.

* * *

Here's one for those who sew for children - these are almost certainly village children, most likely in summer, or maybe spring:


The Czech painter Václav Brožík, who was otherwise mostly gaining traction as a society portraitist and a painter of historic or romanticised historical scenes, actually painted a number of similar scenes of children, as well as other village people, so you can get a pretty good overall idea from that if village life at the end of the 19th century is what you're after. Probably specifically in France, actually, because that's where he spent most of his working life; but here's one I think is almost certainly meant to depict a Czech scene. (Notice the woman in the back knitting a red stocking!)

If you're after city life in Europe at the end of the 19th century, though, especially Central Europe, you really shouldn't miss out on the work of Jakub Schikaneder for some everyday insights, both of working-class people, and this company at summertime leisure that's probably middle-class (I love the proof that the blouse-and-skirt combo was definitely already a thing in 1887, and not limited to white, on the two ladies in the middle):


Or maybe you could make nice cozy mittens for winter! (Their suitability for everyday probably depends on what your everyday looks like...)

c. 1930s-40s wool mittens, Národní muzeum, ID: H8-20091
These are probably from the tail end of the HSM's time range, possibly already from outside it. It doesn't give the measurements, so I'm not sure if they are meant for an adult or a child... but child seems likely. The fact that they are mittens, rather than gloves, as well as the long cuff, suggest they were aiming at practicality, despite the colour and fancy braiding patterns. It is, of course, those fancy braiding patterns that landed these among my historical darlings. :-)

And as a long-time lover of Albrecht Dürer, I would be remiss if I didn't include something by him; this drawing of a girl, with her partlet and headband, has always been one of my favourite portraits by him:


Albrecht Dürer: Portrait of a Girl, 1515, Charcoal. Staatliche Museen, Berlin, via Web Gallery of Art

Accessories are always a good way to go with the challenges, and one that would have undoubtedly been used in everyday contexts is a money purse!


* * *

And while we’re on the subject of money and shopping, how about a reusable shopping bag, which will definitely come in useful even in your modern everyday contexts?

If you’ve ever wanted to try your hand at netting, a string bag could be just the thing to start your netting adventures on. (The link leads to Wikipedia; note especially the Czechoslovakia part, which falls into the HSM range, and I confirmed from another Czech source that that part at least is fairly accurate, if brief.) It became all the rage (at least in Europe) in the lean 1930s when having a lightweight shopping bag of great space capacity ready at hand for whenever a good buy presented itself was quite useful, and bags of this style stayed in use for decades after that (but that's outside our scope of interest for the HSM). Although they were sold commercially, they could also be made at home, which undoubtedly added to their appeal. They are now making a comeback, although the commercially-produced ones are now no longer netted by hand.
(I'll even confess to keeping an indefinitely postponed sewing project bundled up together in one of those... a use for which its see-through quality comes in handy!)


 Despite their historical ubiquity, I had a hard time finding an indisputably 1930s example. So here's a photo from the above Czech source, clearly taken years ago at an exhibition, said to be examples from the 1930s and 1940s - it probably comes either from Vlastivědný věstník Moravský, year XXXIV, issue 2, 1982, which that site cites as its source, or from the Krčil family archive.

They can also be crocheted, and even the (homemade?) netted version would have crochetted handles, as a Czech advice article in Národní listy from 25.3.1928 attests - it also points out that the crochetted version is a bit heavier and bulkier than the super-lightweight netted bag. It suggests to make it, either version, from "perle yarn", "twisted yarn", so I'm guessing a thin crochet yarn that's at least 2-ply and quite firmly twisted will do. The article's instructions will probably give you a smaller bag of this kind - they refer to it as a "purse", and make mention of larger bags; so if you want a bigger one, size up accordingly.
For netting such a "purse", the suggested diameter of the stick is 5-6 mm - quite small, probably to prevent things from falling out. Starting with 30 loops and increasing until you reach 50; then you do 20-30 rows of 50 loops and start decreasing again, until you create a netted hexagon. This you then crochet around, with two stitches in every loop, gathering the sides a bit and creating the "rim" of your bag, with an opening of about 45 cm in diameter. You add two more rows of crochet and crocheted handles; both the rim and the handles can be strengthened by crocheting around a cord. (The resulting bag would certainly look something like this one, from the abovelinked Czech source - unfortunately they give no date on that bag. But it illustrates neatly what the article also makes mention of - that one can have fun with colours!)
The article also suggests you can sew a small envelope bag / pocket to keep your bag in when not in use; they extoll the beauty of keeping your hands free for most of your walk if you have a lightweight, easily packable bag like that. I'm definitely tempted to give it a try one day. :-)

But other types of bags are out there - this one is dated a bit outside the HSM range, but perhaps not too much so to make it implausible to use as inspiration for the very tail end of the HSM range. It is, interestingly, made of prefabricated straps in order to achieve a far more substantial, heavy-duty bag.

Not to mention that certain 1790s reticules could well double as shopping bags, if one is to believe their size in the fashion plates! This one in particular seems suspiciously bulky (are those outlines of round shapes hints of balls of yarn? apples?!). No dainty special occasion purse for this lady!

Journal des Dames et des Modes, 1797-1798, Rijksmuseum, ID: RP-P-2016-8-125

And if you're going to be out and about on your everyday historical errands, you're definitely going to need some type of head covering, as this lady also shows.

* * *

It's apparently a costuming trend right now to sew things you can wear in modern contexts as well. I am all for that; just keep in mind that for the Historical Sew Monthly you should keep the modernising aspects of that trend well outside the sewing room door. There is still a surprising number of things that could pass the muster both ways!
 
Good luck, and have fun creating things that you will get much everyday use out of!

Sunday, 27 January 2019

HSM '19 #2 Inspiration: Linen/linens

The second challenge for Historical Sew Monthly 2019 is Linen/linens: make something out of linen, or that falls under the older definition of linens: ie. underclothes (lingerie literally means linen).

Linen, made from the fibers in the stems of the flax plants, is one of the oldest textiles there are (at least in the Old World), so you're safe to use it even if you by any chance do Sumerian or Ancient Egyptian impressions!


Wikimedia Commons tell me that bunch of stalks before Ani represents a bale of flax. Whether or not that's the case in this particular artwork, the clothes he wears most probably are linen.

Egyptian linen was known to be so fine as to be transparent, an aspect of linen you may also be familiar with from fine caps, fichus and chemisettes in the later centuries.


And while your quintessential transparent white Regency dress is usually made of Indian cotton muslin, you can actually find some linen extants as well - taking that clothing article that much closer to the example of antiquity they were aiming at!


And throughout the centuries, it was a popular material for fine laces, more easily obtainable in Europe than silk.


Lace may be too much for you to recreate for the challenge (but isn't the one above adorable?), but of course these would often be attached to chemises and shirts, or separate collars, also made of linen.


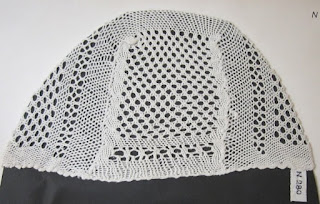
Linen was a home-grown fibre in Europe, and as such, something that you find very often in peasant / folk costumes. One aspect of it I find particularly fascinating is that in several countries (or regions, specifically), women wore caps / bonnets made with the very ancient technique of sprang well into the 20th century. These were usually made with linen thread, although later also cotton (and I've unfortunately only tracked down cotton examples, but the style is the same).


Another use of linen completely hides the linen in your project. I mention it here because it often lands you with search results on museum sites that list "linen" among other materials, without the linen actually showing on the outside of the garment, so it's something to watch out for:
Linen was used extensively as a lining fabric underneath other fine materials - often, before the methods changed in the 19th century, you would drape the garment in the lining fabric, i.e. the linen, and then mount the silks or wools on top of this linen base.

This presentation on the Lengberg finds makes a case for it being the case back in the 15th century!


We discussed this particular application of linen with the moderators, and the final consensus was that if linen linings are a step towards greater historical accuracy for you, or you just happen to be working on a project like that right now, feel free to use it as a justification for your entry for this challenge.

Aside from the hidden linings, medieval depictions show white accessories like headwraps and aprons that would have definitely been made of linen.

And you can, of course, totally justify your linen linings if your outer fabric also happens to be linen!


But linen is also known as a nice material to wear in summer heat, and it was used that way in the past, unlined, in articles of clothing that were otherwise usually comprised of far more layers.


It's also known to be good at wicking moisture (that's part of what makes it nice for summer), and that, together with its ability to withstand repeated washings, made it an ideal material for underclothes like chemises and shirts.


Which ties us neatly into the other interpretation of this challenge: underwear.

Especially if it happens to be made of linen. ;-)


If you're going the underwear route, you don't necessarily have to use linen the fibre, though (it's not always easy to find in the correct weight for fine underwear these days). It is, however, the most accurate material for the earlier periods.

From cca the end of the 18th century onwards, you find cotton being used in the same underwear applications as linen fairly often.

And of course, for certain things you could use silk.


Or even, as a more affordable option in the 20th century, viscose / rayon.

And if you're currently in the cold part of the world, or on the other hand would like to prepare for when your hemisphere is plunged into winter, you could even use wool.


Just please don't take the interpretation even further and don't make household linen instead! The HSM is meant for garments or accessories worn by a living person, normally not for other types of sewing. (Some challenges, like the Sewing Kit challenge this year, may specify you can also make something else, but those are only the exceptions proving the rule!)

Hopefully that still offers you a wide choice of things to pick your project from for this challenge. Happy creating!

(You can search, on museum sites, not only for "linen" but also "flax" - the term for the plant - or "bast" - the general term for plant fibres like linen. On different language sites it depends on the particular language the site is using, of course...
On Czech sites like esbirky.cz, you can search for "len" - the material / fibre, or "lněný" / "lněná" / "lněné" - the adjectives. The downside to the adjectives is that, depending on the algorithm, you may accidentally end up with wool and cotton objects, too... "vlněný" and "bavlněný", respectively. Yep, Czech is fun!)

Sunday, 7 January 2018

HSM 18 Inspiration: #1 Mend, Reshape, Refashion

Welcome to the Historical Sew Monthly 2018! If you are new to this year-long event, you can read all about it on The Dreamstress’s website here. I've volunteered to write the inspiration post for the first challenge of the year, which is:

Mend, Reshape, Refashion: Mend or re-shape one of your previously made historical clothing items, or refashion a new one out of something not originally intended as sewing fabric.

 
Louis- Léopold Boilly: Passer Payez, c. 1803. Wikimedia Commons. Notice the patch on the man in the very left.

Now, if you’ve been making and wearing historical costumes for a while, chances are you do have something that needs mending, or updating to match your current skill set and knowledge, or re-shaping to fit your current figure (or somene else's) better.

Like I did for the November challenge of 2017 (which I haven’t yet blogged about, typical for 2017). I had never been satisfied (and finished) with the inside bodice flaps of my sleeveless 1800s dress, and one of them finally tore, and possibly also my bust has increased a little since I made the dress. So I finally replaced the unnecessarily fussy drafted shape of the original flaps with simpler, more historically accurate (and slightly wider) rectangles.

 
On the right, fussy flap shape drafted with modern drafting sensibilities (notice the neckline curve); on the left, the new rectangle

Mending is something that undoubtedly happened with clothes all throughout history because for most of history fabric was quite valuable; although conservation bias often leaves us with the special, lightly worn clothes rather than those that were worn within an inch of their clothing life.

While searching for things to showcase here, I came across Bránn's and Pat Poppy of Costume Historian's posts - they have already done some of the research into repaired extant clothes in the earlier periods I don’t habitually look into. So thanks to them, I came across extant clothes like the Bernuthsfeld tunic and these heavily patched sailor's clothes:

Shirt and breeches, linen and cotton, 1600-1700. Museum of London, 53.101/1a,b.

These are indeed clothes worn to within an inch of their life, probably by people of lower classes who had no other choice. But mending is not just like that...


Wedding dress of Maria Theresia Countess Czernin, née Orsini-Rosenberg, 1817, from the collections of the chateau Jindřichův Hradec (photos mine from an exhibition in chateau Dačice).

There is a patch here underneath the raised waistline. (I was so excited the photo came out blurry...) To tell the truth, I do not really know whether the patch was added during the countess’s life or during the ages since; what I like about it is the fact it proves that yes, these fine fabrics do tear and did tear. If they tore for Mrs Allen in Northanger Abbey and for Countess Czernin, it’s par for the course with them; go ahead and try mending them as neatly as too make Mrs Allen proud.


Reshaping clothes is another option. And because this often happened with clothes that were of better quality (so that one would get more wear out of the expensive and still nice fabric), you can, I think, find many more surviving examples of unpicked seams and other alterations than there are of patches, if you only peer more closely at museum garments and their online photos.

You can just adapt a garment to a changing figure, or perhaps you can make something for a smaller figure than the original garment was intended for...

Instructions for cutting a boy's undervest out of old lady's drawers in the Handarbeit-Wäsche-Wohnung magazine, 1933, Otto Beyer Verlag, Leipzig-Berlin


Or, what you could also do is reshape a garment to match new fashions (or new costuming interests). There is, for example, a number of 1790s-1800s dresses re-made from earlier ones; the huge amount of fabric in rococo dresses allowed the update to the more streamlined high-waisted fashions fairly easily. One of my favourite examples is this 1790s dress in the Met, in a fabric very unusual for the era; if you zoom in, you can even see the seam running above the hem where fabric was added to accommodate for the longer skirt of the raised waist – the join is nearly lost in the busy pattern but in the side view, you can clearly see there are non-matching vertical seams towards the front...


(Preferrably, though, don't do this to garments that are already antiques.)

Piecing was common historically, both for re-made dresses and just to get more out of the narrower fabric goods available in the past. So it can also be used with aplomb to get more out of something not originally meant to be sewing fabric: in HSF 2013 (back when it started and was still the Historical Sew Fortnightly), Sarah awed everyone with a pieced 1840s dress squeezed out of a tablecloth.

And there are many other fabric items one could do something with! Curtains and bed linen are popular with costumers (not just characters on film), because home furnishings these days often revive patterns that passed out of fashion for clothes decades and centuries ago. Perhaps somewhat less creative, but a perfectly good choice for this challenge.

Part of my fabric stash, with 18th-century-patterned IKEA duvet covers in the forefront - the same ones Magpie Tidings made a lovely reproduction of a 1780s dress out of in 2015. My plans for it are currently for a 1790s one.
The flowered golden stripes in the background are another clearly historically-inspired print - but unsuitable for this challenge because it's fabric meterage. Neither would the green sari work: it's also basically just meterage. (Leimomi says that a used sari is acceptable, but a new one isn't.)

In the lower left corner, a peek of embroidered panels & chain of an old frame bag I took apart to clean and remake, back when I did not have the good sense to realise how old the original probably was and take pictures. It's a project stalled for many many years by a lack of matching materials and bag-sewing confidence; maybe I could finally finish it now...


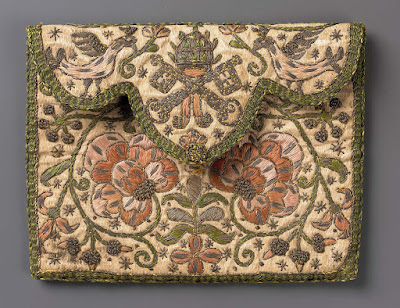
Even thrifted clothes can be used: I like them as a cheap source of smaller quantities of really nice materials I could not afford otherwise (like silk); which can then be used for example to make pretty accessories.

Pocketbook, silk, embroidered with silk and metallic yarns, Italy, 1675–1725. Museum of Fine Arts Boston, Accession Number: 44.617

Positions on fur differ; personally, I think re-using them when they are already out there is more respectful to the animal than just throwing them away. And faux fur is always an option, of course.

Or you could even sew stockings out of thrifted knit garments.

Pair of Woman's Stockings, silk knit with metallic-thread embroidery, Europe, 1700-1725. LACMA, ID: M.2007.211.134a-b
Silk knit garments will probably be hard to find, so one may have to compromise on accuracy there. I have seen a couple of early 18th century stockings with such horizontal stripes at the top, which, if you're lucky in your thrift shop finds, could allow you to piece them out of several garments.


Or you can alter existing accessories, like reshaping hats into historical headwear, and trimming them.

Journal Des Dames et des Modes / Costume Parisien, 1828, Rijksmuseum

But if you are at the beginning of your historical costuming journey, making undergarments is a very good place to start your wardrobe, and the plain cotton fabric of something like bedsheets can work quite well for that purpose! (Especially since cca late 18th century – before that time, cotton was a more expensive option than it is nowadays, and linen would be used originally.)

Petticoat, cotton, American or European, third quarter 19th century. Metropolitan Museum of Art, Accession Number: 2010.487.7

On the other hand, if you're feeling confident and adventurous, you could take the idea of the challenge even further and do as the maker of this bag did: they stringed cloves like beads. (Isn’t it wonderful that it survived to this day? There's also a cloves necklace from the first half of the 19th century...)


While for the sake of expediency we speak of fabric in the challenge description, you can use other techniques and unusual materials (as long as they form a substantial part of your challenge item). Seeds could also be used for jewellery: simple rosaries are traditionally made of bladdernut seeds in Europe, and Adam Mickewicz’s heroine Zosia in Pan Tadeusz (depicting events in Lithuania in 1811-1812) has a set of earrings made of cherry pits that she got from a childhood admirer. For those of you in the southern hemisphere, this might be a chance to enjoy the summer in brand new ways! :-)


And those of us in the grey grip of winter could perhaps unravel a few thrifted items and knit ourselves something warm and colourful.